In a few words
Paired with the services of Mapo Planner & Route Planner, Mapo Driver offers you a complete solution for managing and tracking your routes in real-time!
Quick Start
Downloading the app
Download link for "Mapo Driver" on the stores:
Languages
The mobile app is available in English 🇺🇸, Spanish 🇪🇸, Italian 🇮🇹, and Romanian 🇷🇴. Mapo Driver is translated according to the language selected in the phone settings.
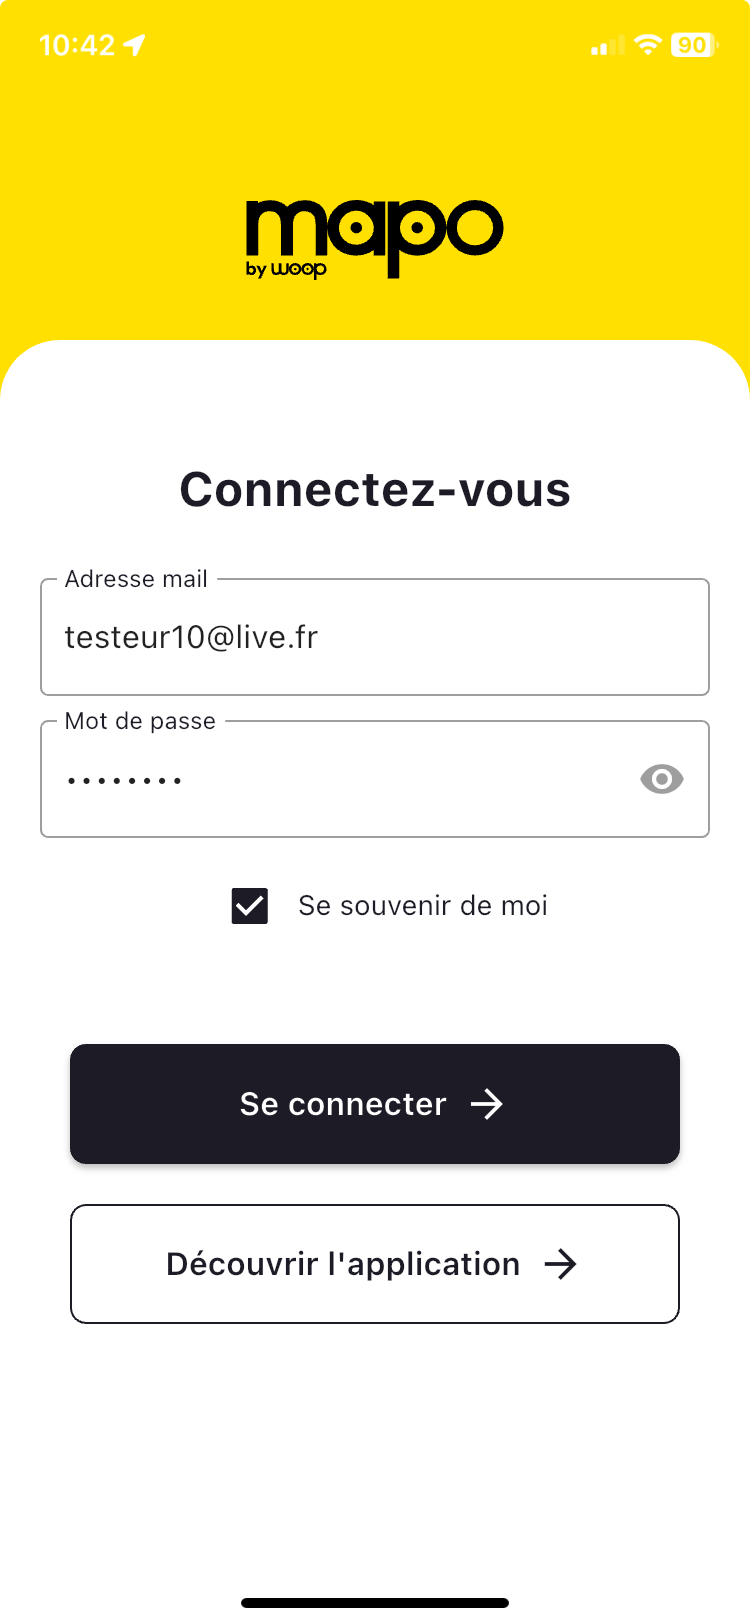
Login / Demo Mode
To log in:
- Download the "Mapo Driver" mobile app from the stores.
- From your device's home screen, tap on the app.
- Enter the email address and password provided by your manager. If you've forgotten it, contact your manager to reset it.
- Tap "Stay logged in" if you want Mapo Driver to save the email address and password for the next login.
- Tap "Log in".
To access the Mapo Driver demo:
- Download the "Mapo Driver" mobile app from the stores.
- From your device's home screen, tap on the app.
- Tap "Explore the app" to be reminded if you wish to subscribe.
 .
. 
Compatibility
| iOS | Android | |
| Required RAM | / | 4 GB |
| Required Version | iOS 12 or later | Android 10 or later |
GDPR Compliance Policy
Refer to the general GDPR compliance policy.
Data Collected
Name, Email Address, Phone Number, Physical Address, Precise Location, Approximate Location, Photos or Videos, User ID, Device ID, Product Interaction, Crash Data, Performance Data, Other Diagnostic Data
Contact Support
https://help.woopit.fr/hc/fr/https://woophelp.zendesk.com/agent/dashboard
Features
Authentication
The user can make accessing their Mapo Driver account easier by:
- entering their email address and password,
- ticking the "Stay connected" box.
Within 3 days, if the user wants to access the Mapo Driver app, a simple click will automatically log them into their account without needing to enter their email and password, provided they ticked the "Stay connected" box. Additionally, there will be assistance in filling out their email and password to avoid having to type the entire address and password.
However, if the user does not tick this box, they will not be automatically reconnected the next day and will need to manually enter their email and password to access their account.
Evaluation of Mapo Driver
To gather feedback from mobile app users and better address issues and improve user experience, we display a rating popup:
- after completing the first route, i.e., at the final status of the last mission of the route,
- if they do not respond, the popup is displayed again 3 months later.
Activation of Geolocation
When downloading or updating the mobile app, the user sees a tutorial for enabling their geolocation.
The activation or deactivation of geolocation details can be viewed and managed from the settings in the menu.
This tutorial is triggered upon user login, and the configurations will affect the features:
- of user tracking in the Mapo Planner dashboard,
- of position reporting at the user's request.
Settings
The settings are accessible from the menu at the top left.
Here, you can configure different service states of our mobile app's operation.
.
.
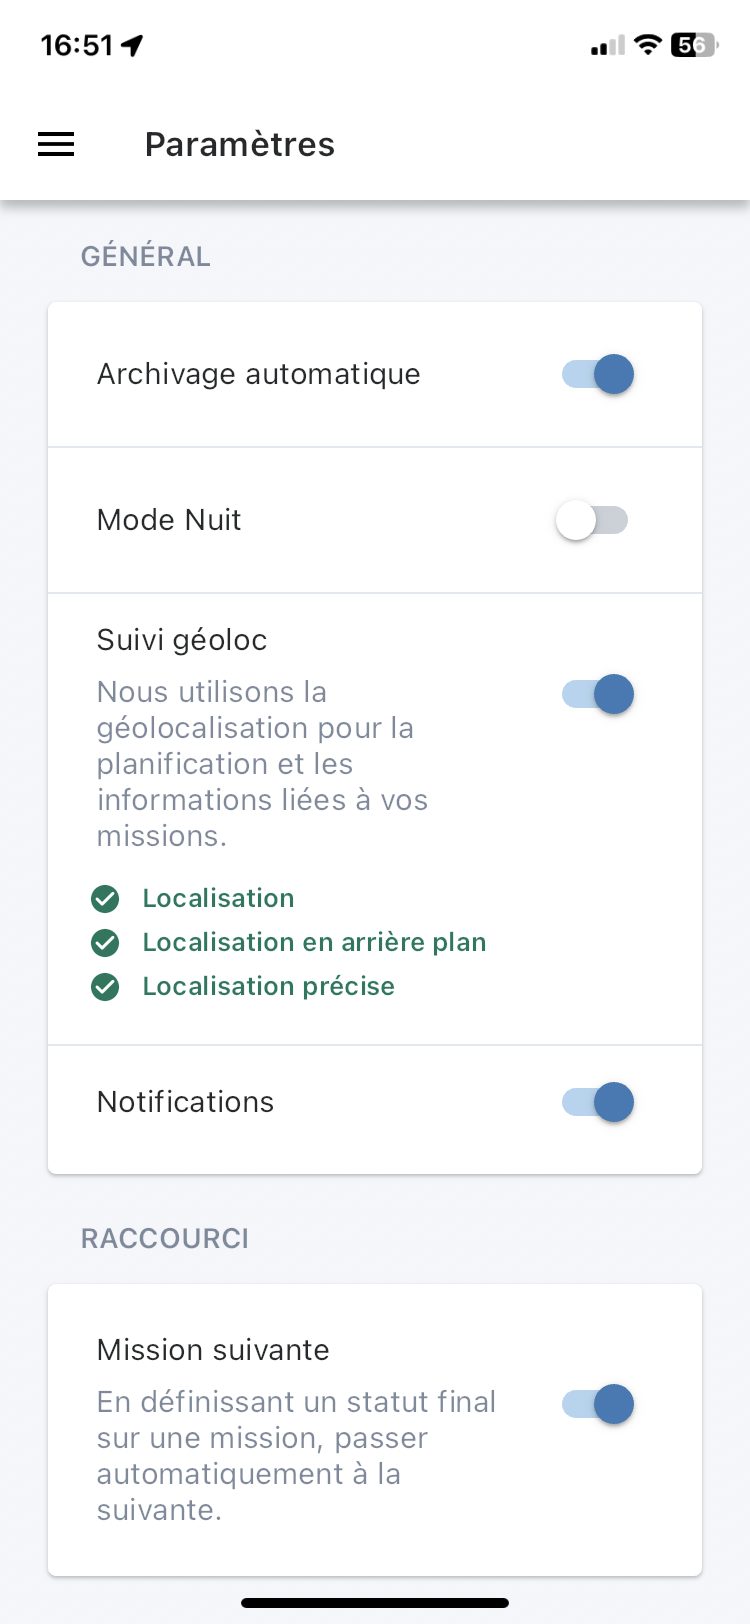
Use the toggle to activate or deactivate each setting:
- automatic archiving: when the status of the last mission of the route changes to "Completed", we automatically archive the route,
- night mode: you can save your device's battery and view more easily in low light,
- geolocation tracking: this is used to allow the planner to track the route's progress from the public portal, and for the driver to report their position. Additionally, we use it to calculate the Estimated Time of Arrival (ETA), for which SMS/emails can be configured and triggered,
- next mission: when a mission is completed, we automatically switch the driver to the next mission.
Scrolling down the page, you will find the "About" section where you can access:
- our privacy policy,
- our legal notices and,
- our terms of use.
Offline Mode
In case of connection or synchronisation issues with the mobile app, due to "dead zones" or the performance of the phone used, a message will appear indicating whether the mobile app is connected or not. When the connection is restored, a new message will appear confirming that synchronisation has been re-established.
When the app is offline, meaning without connection or the ability to synchronise with a planning tool, the mobile app still functions!
No information will communicate with the route planning tool, but the user can continue to complete their routes.
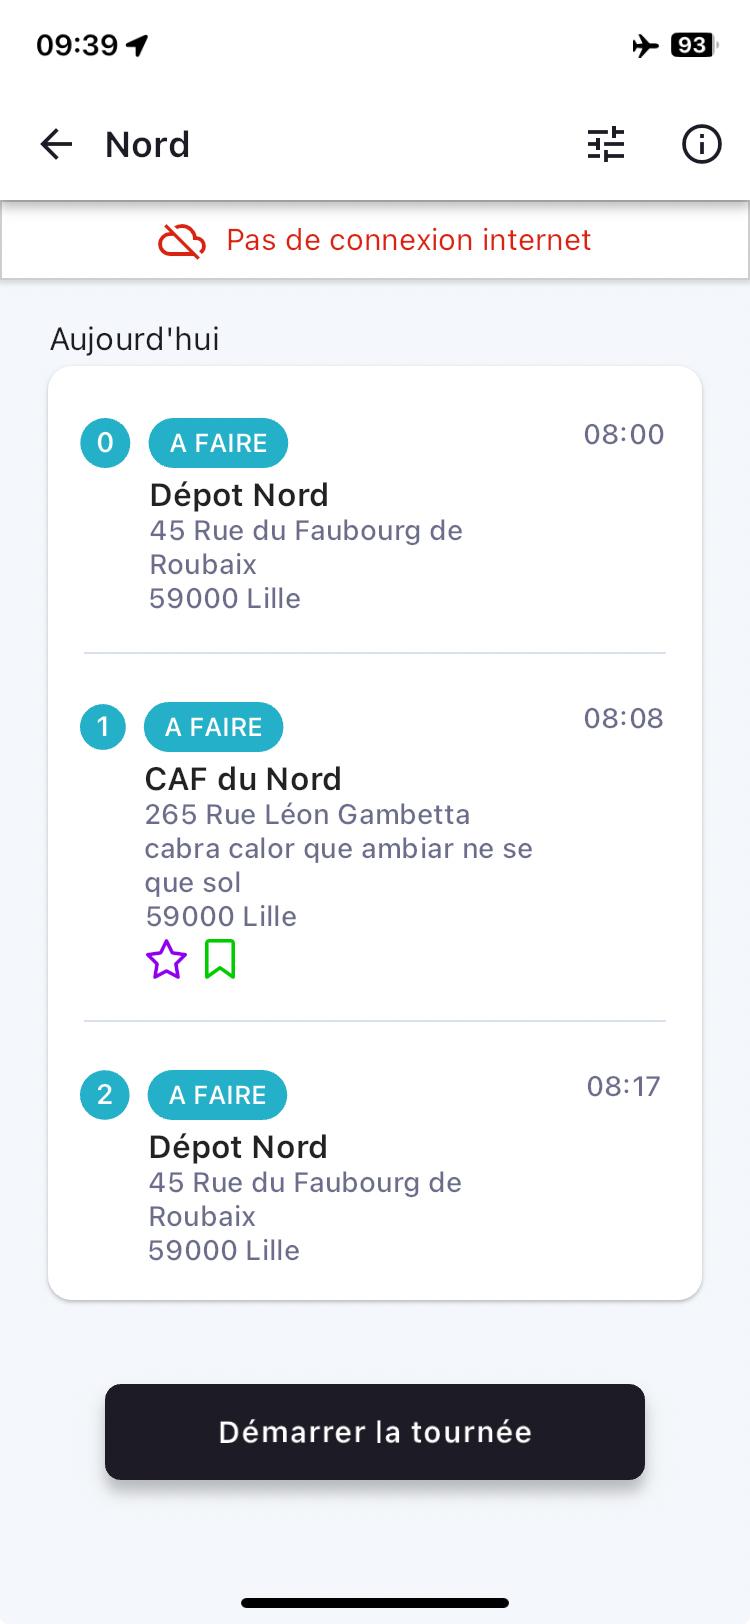
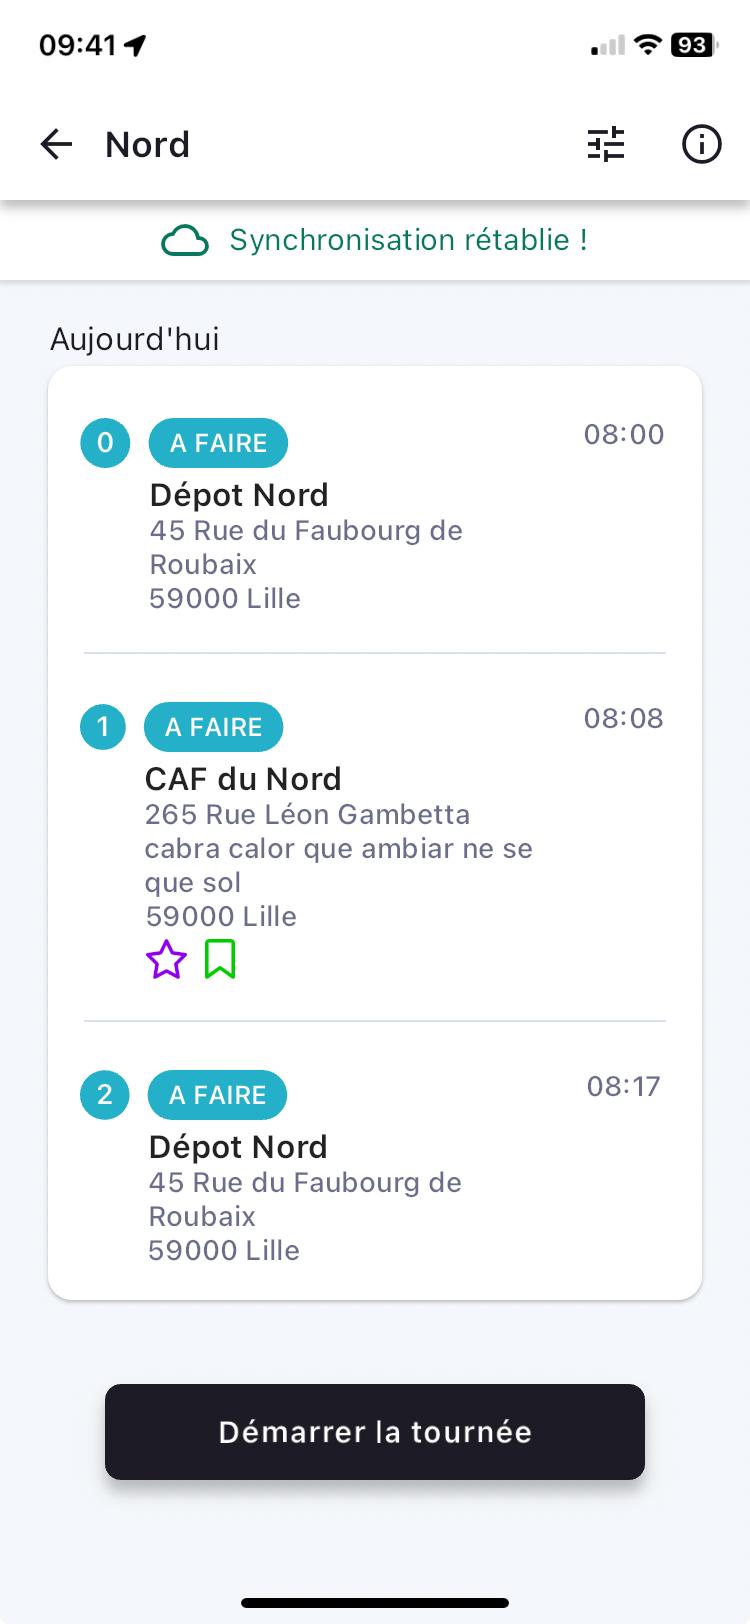
The information from the user's actions in the mobile app will be stored until reconnection with a network and with the carrier's planning tool.
When the connection is restored, a new message will display confirming that synchronisation has been re-established.
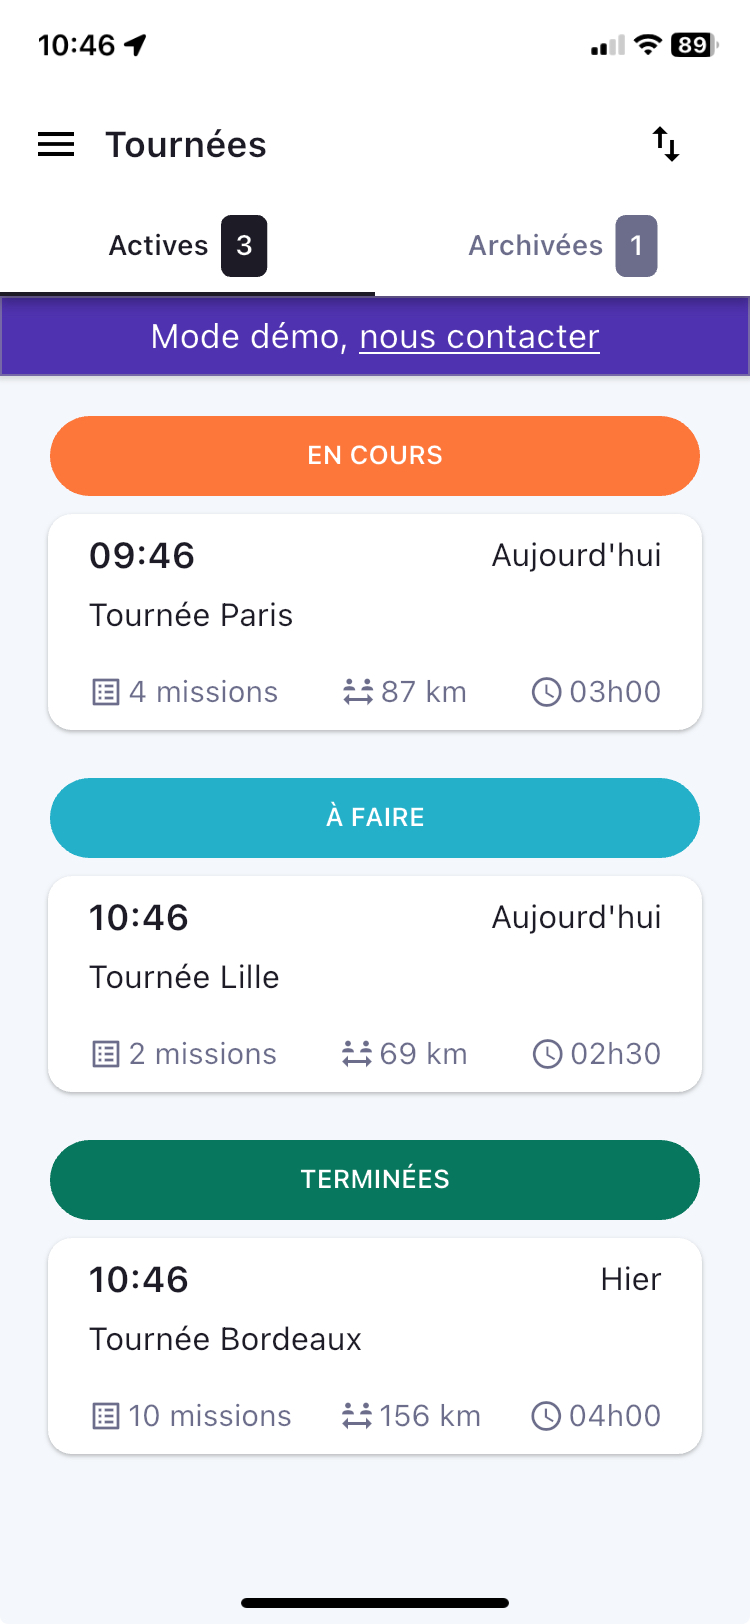
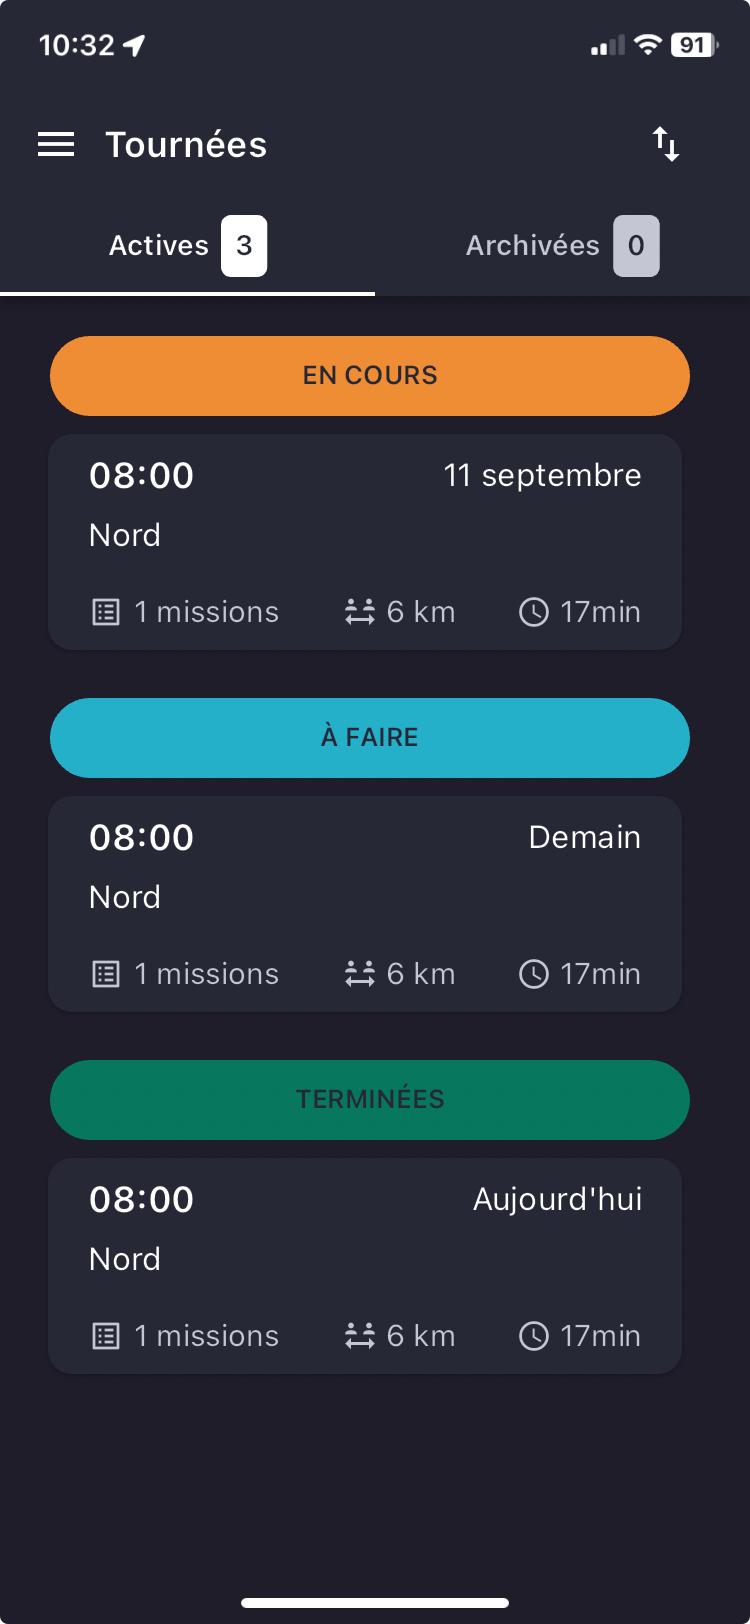
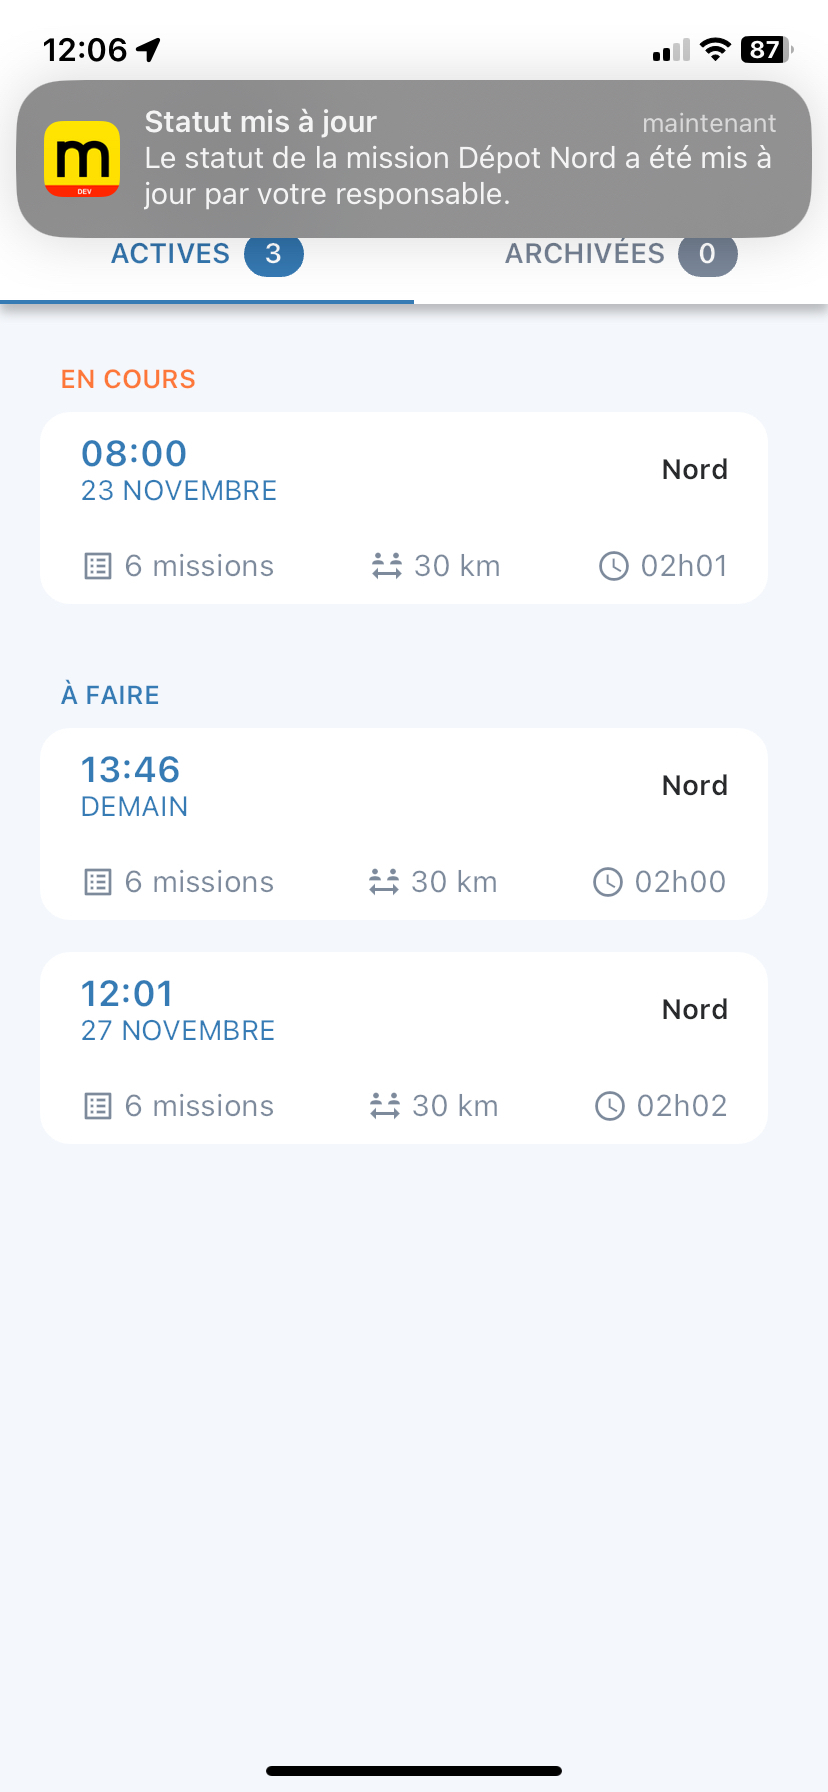
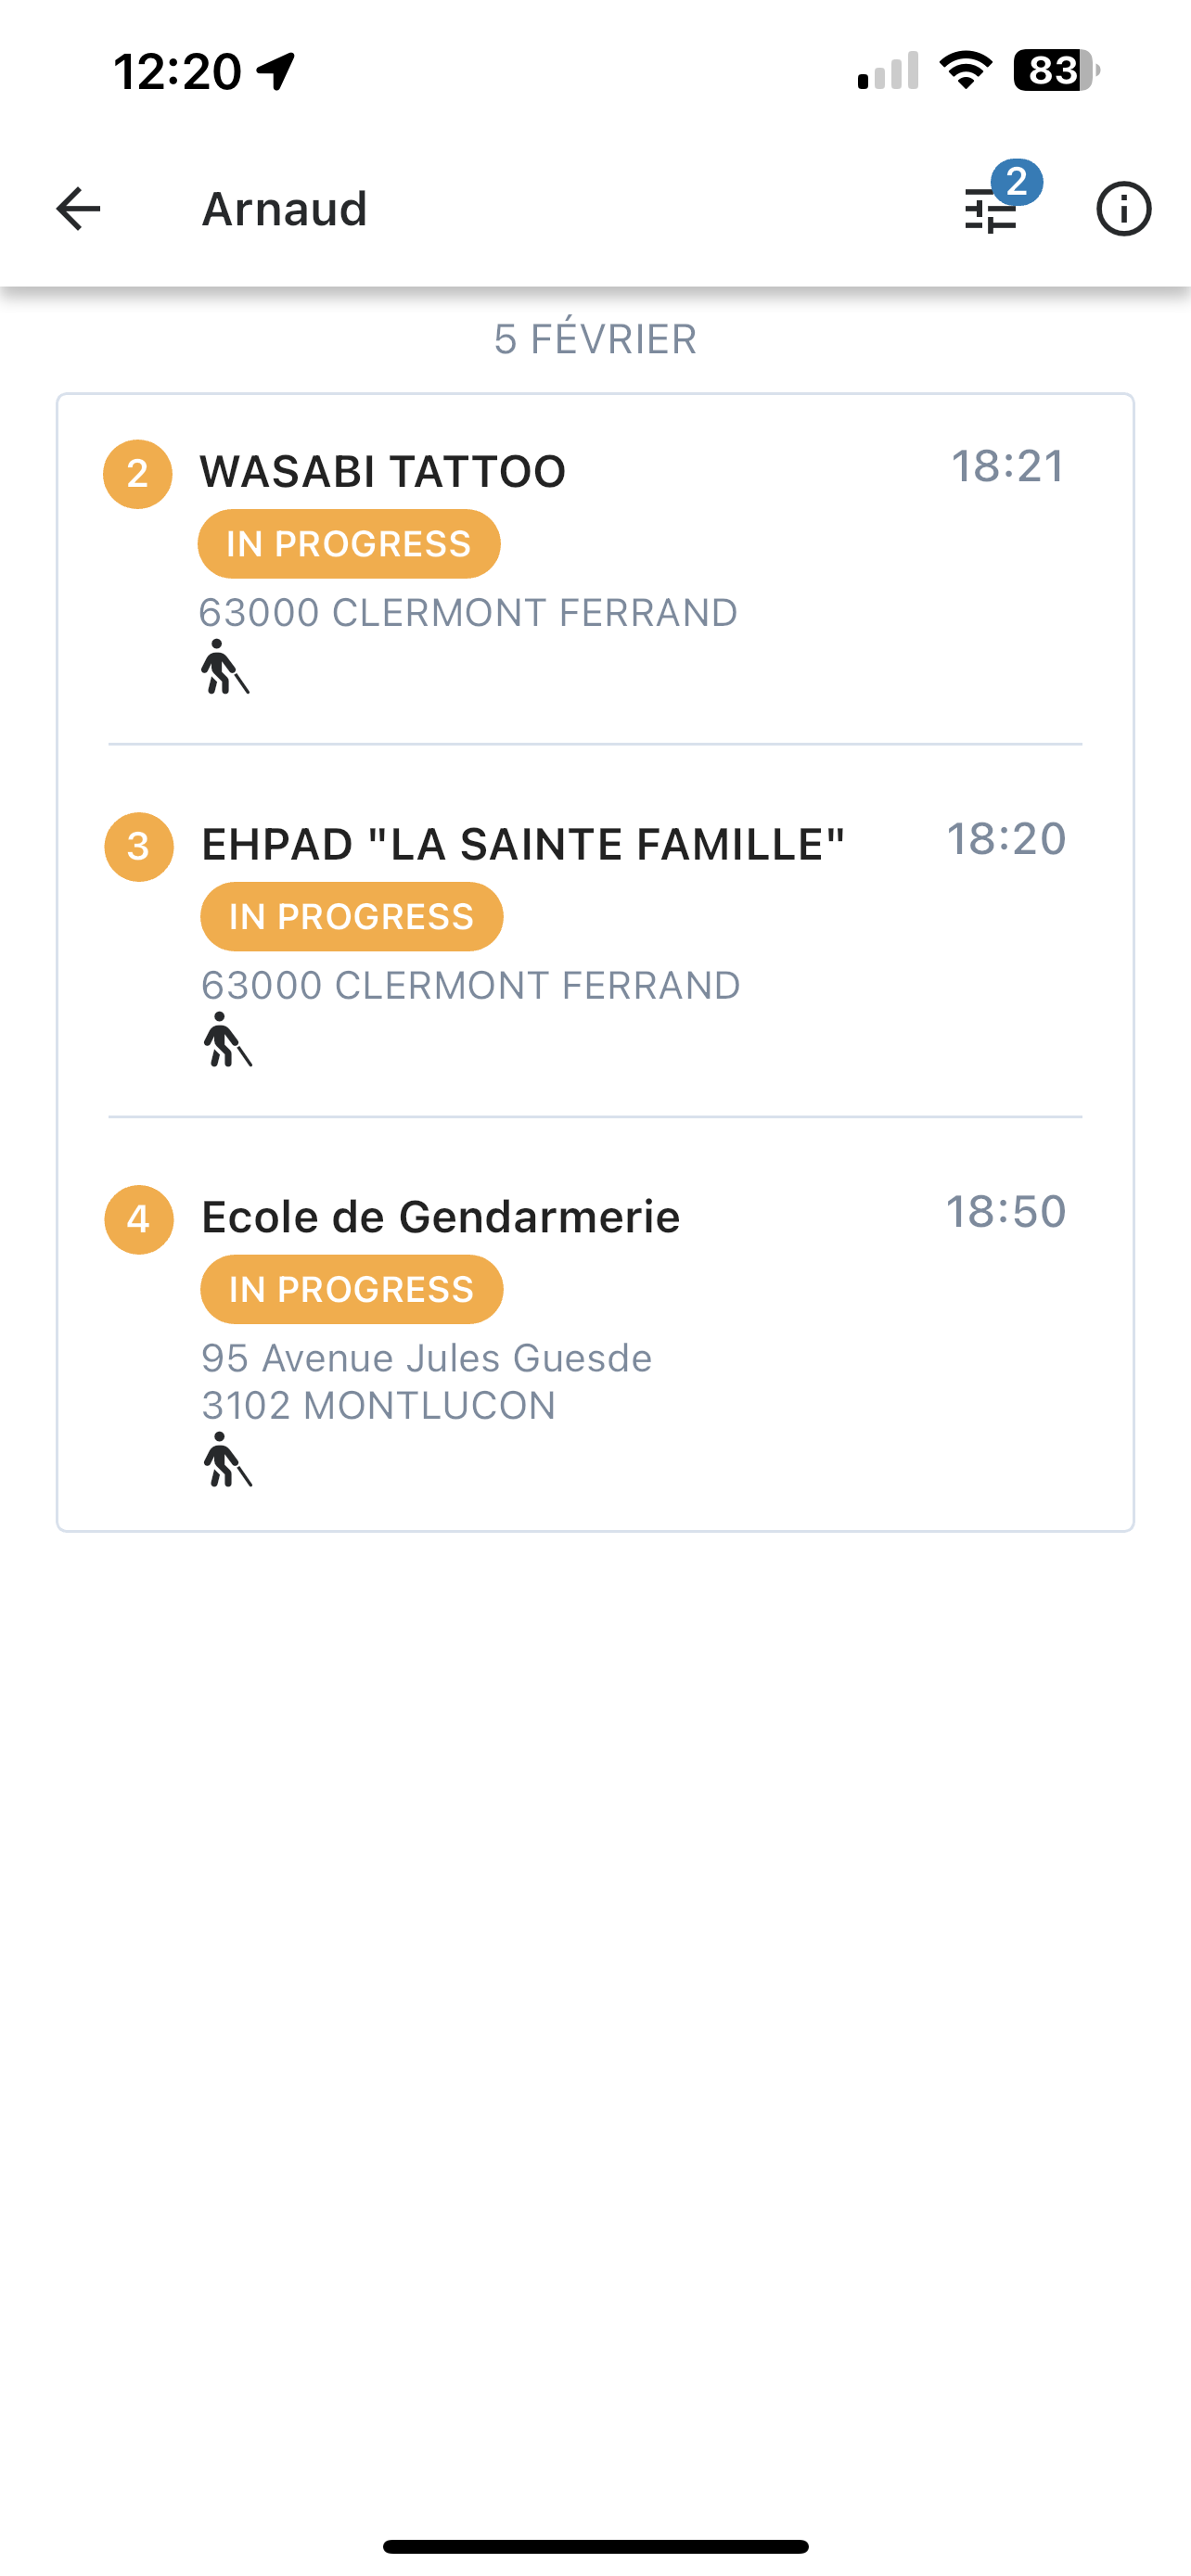
List of Routes
Once connected, by default, you are on the page showing active routes. You can view your active and archived routes on the same page.
Active
You can view all active routes and their respective information on a single screen!
Find:
- the status of the route,
- the date of the route,
- the scheduled start time of the route,
- the name of the route,
- the number of missions in the route,
- the total theoretical distance of the route,
- and the total theoretical time of the route.
Click on a route to access the missions and their attached details.
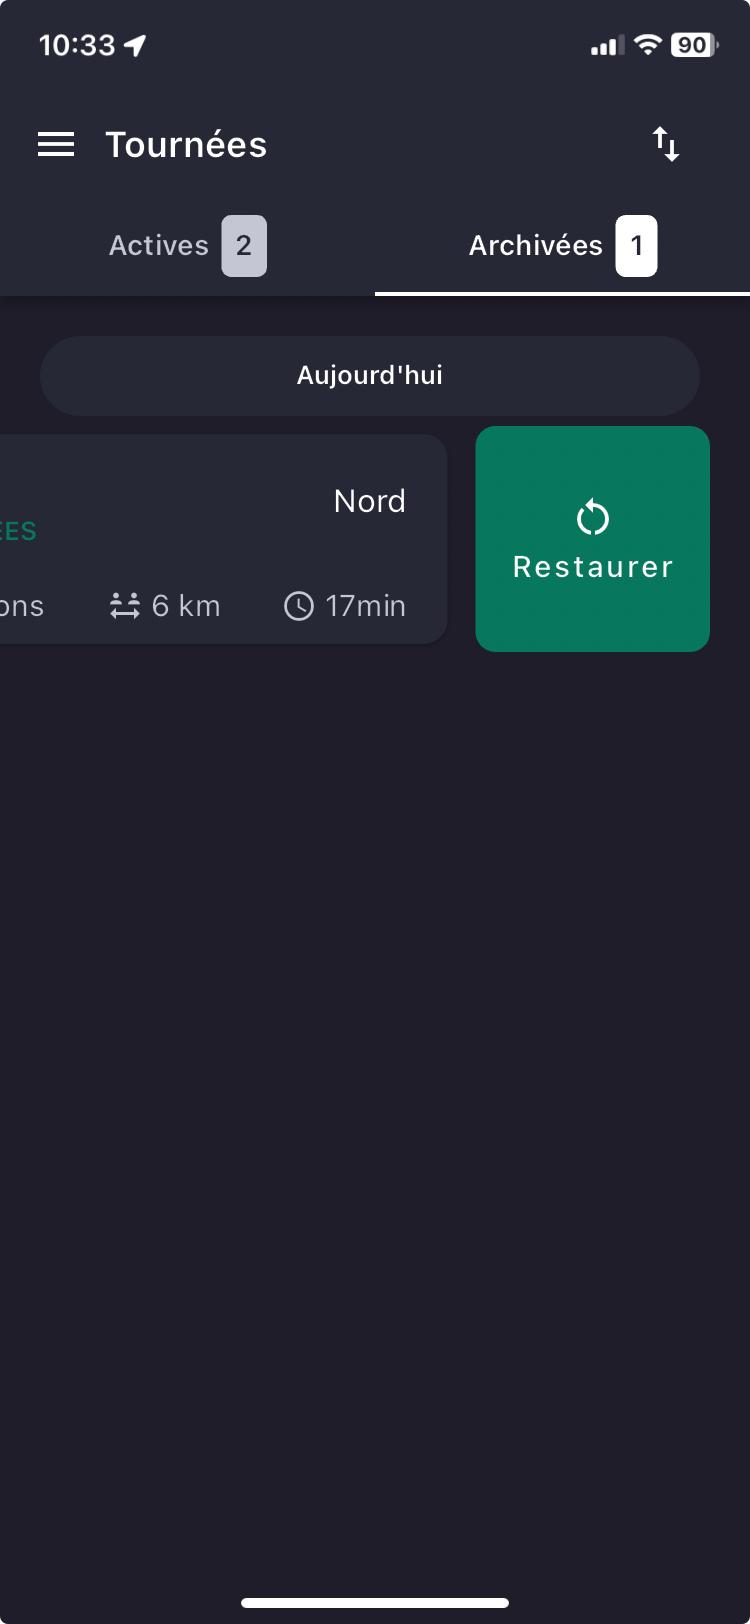
Archived
You can view the list of all routes that are completed.
The missions and details of archived routes cannot be viewed. To do so, you must restore the route to access the details.
Your archived routes are kept for 15 days in the mobile app. After this period, they will be deleted from the mobile app.
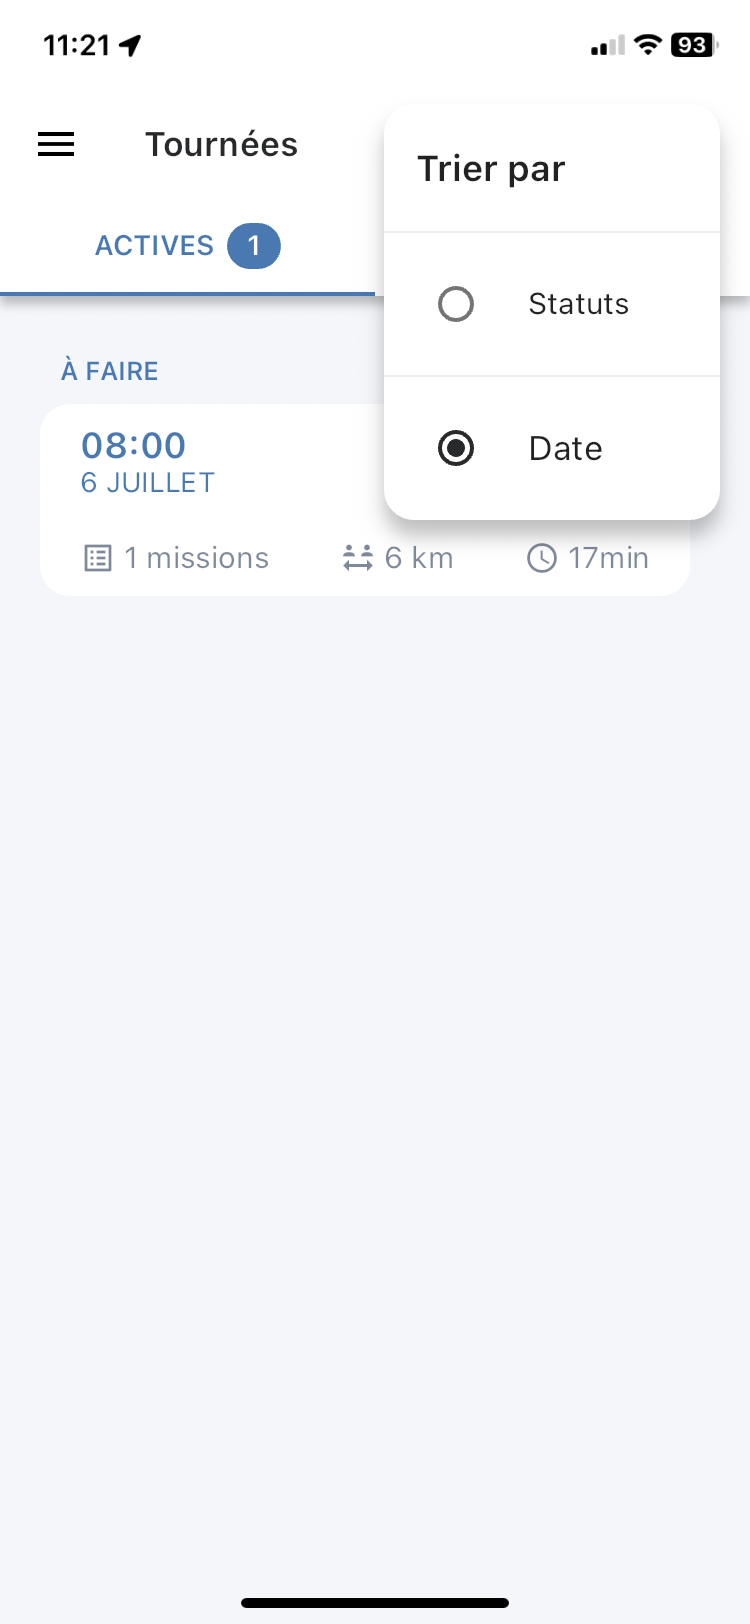
Sorting Routes
From the list of routes, it is possible by clicking on the filter to sort your routes either by status or by date.
When sorting by status is selected, the routes are arranged in the order below by increasing date and time:
- In progress
- To do
- Completed
When sorting by date is selected, the routes are arranged in the order below:
- Sort and display in ascending order, from the past date to the furthest in time
- They are arranged from the earliest to the latest time
 .
. 
Tracking of Completed Missions (geotracking)
The planner or driver manager can view the actual progress of missions from the tracking dashboard.
There are several conditions for viewing:
- The "Completed Tracking" option is enabled on the account used by the driver,
- The tracking is established if:
- All geolocation is enabled in the mobile app
- Permission to use location
- Background permission
- Precise location permission
- All geolocation is enabled in the mobile app
- The tracking starts when the route begins
- The tracking ends when the route is finished
- The tracking ends when a route is archived
- The tracking only concerns one route (if the driver has several)
- The tracking resumes when the mission status of the route is updated
- After 2 days, the tracking is deleted from the app
- After 1 month, the tracking is deleted from the Couchbase database
- The tracking is only active during the driver's route hours.
E.g.: if the driver starts earlier, the tracking will not be effective
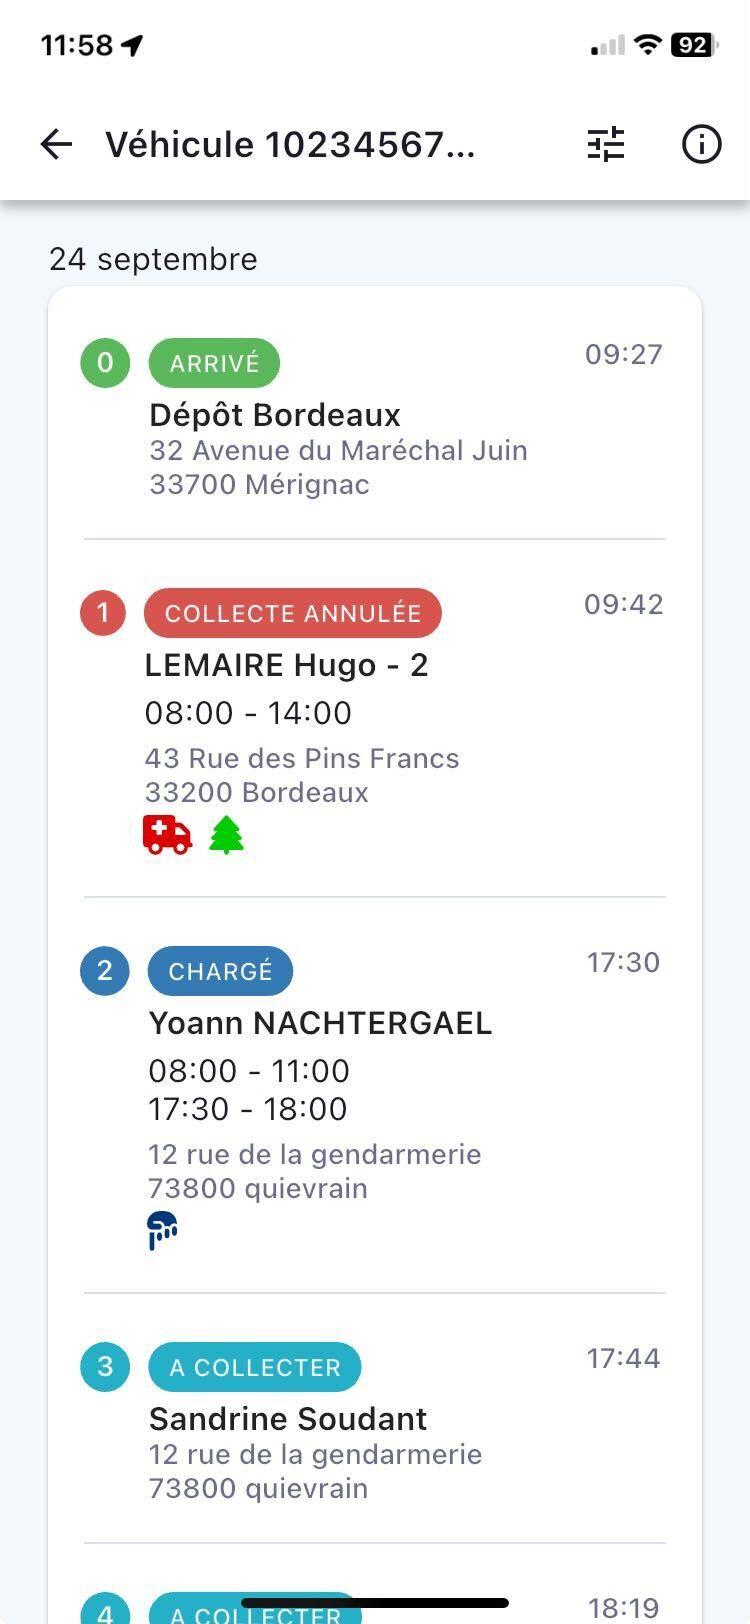
List of Missions
You can view all your missions on the same page.
Just like the route page, you will be able to see all the details of your missions!
Find:
- the name of the route (e.g.: "South-West"),
- the date your missions were completed,
- the estimated arrival times at the destination,
- the statuses of your different missions,
- the name of each mission,
- their respective addresses
- as well as the delivery slots if they are provided.
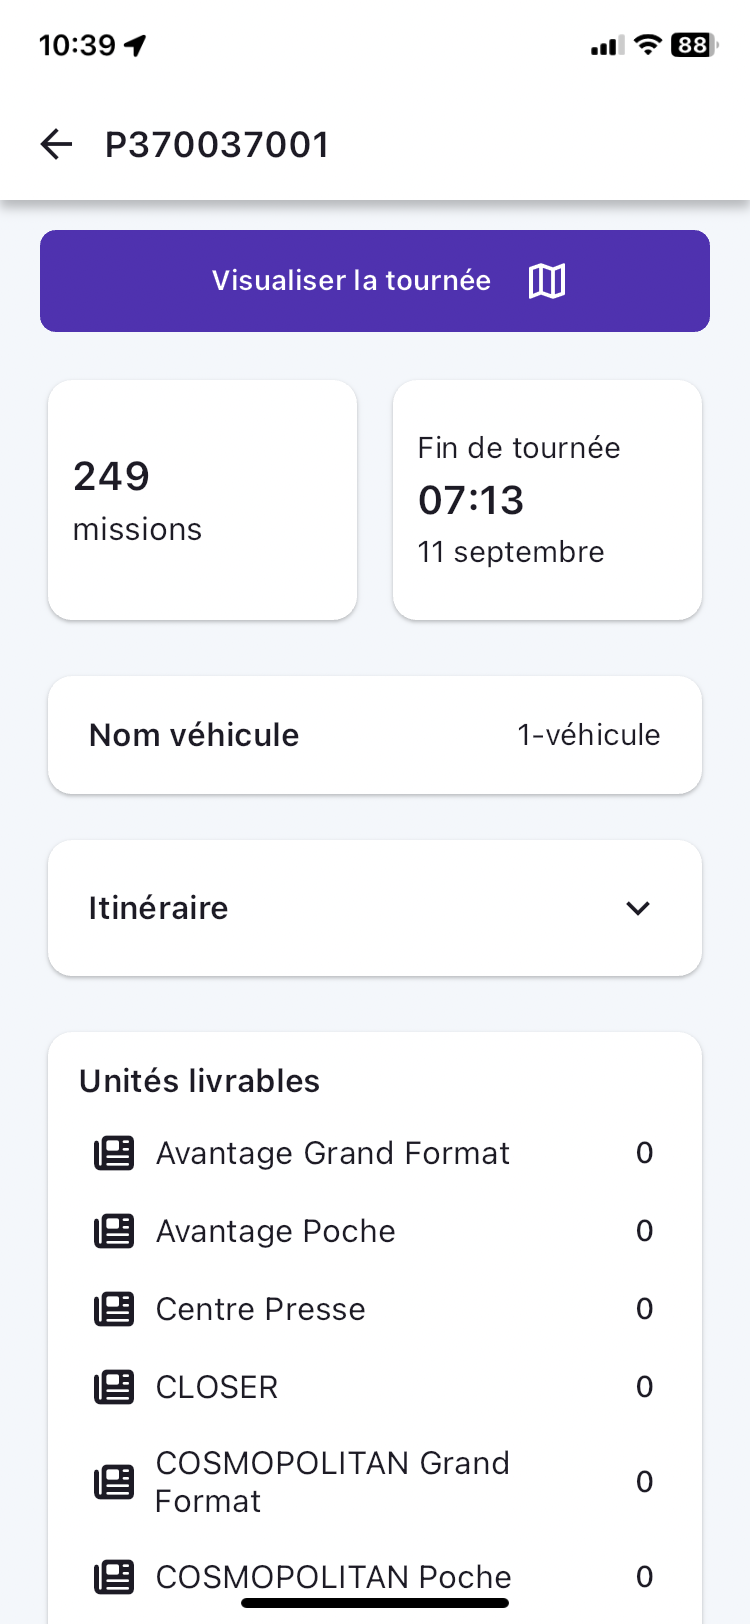
Route Summary
In the context of anticipating and preparing for routes, the route summary presents the essential information of:
- number of missions in a route,
- the list of cities where deliveries are scheduled,
- the end date of the route,
- and the end time of the route.
This information is displayed in a pop-in:
- from the screen listing the missions of an assigned route,
- and on the first click of the user on an assigned route.
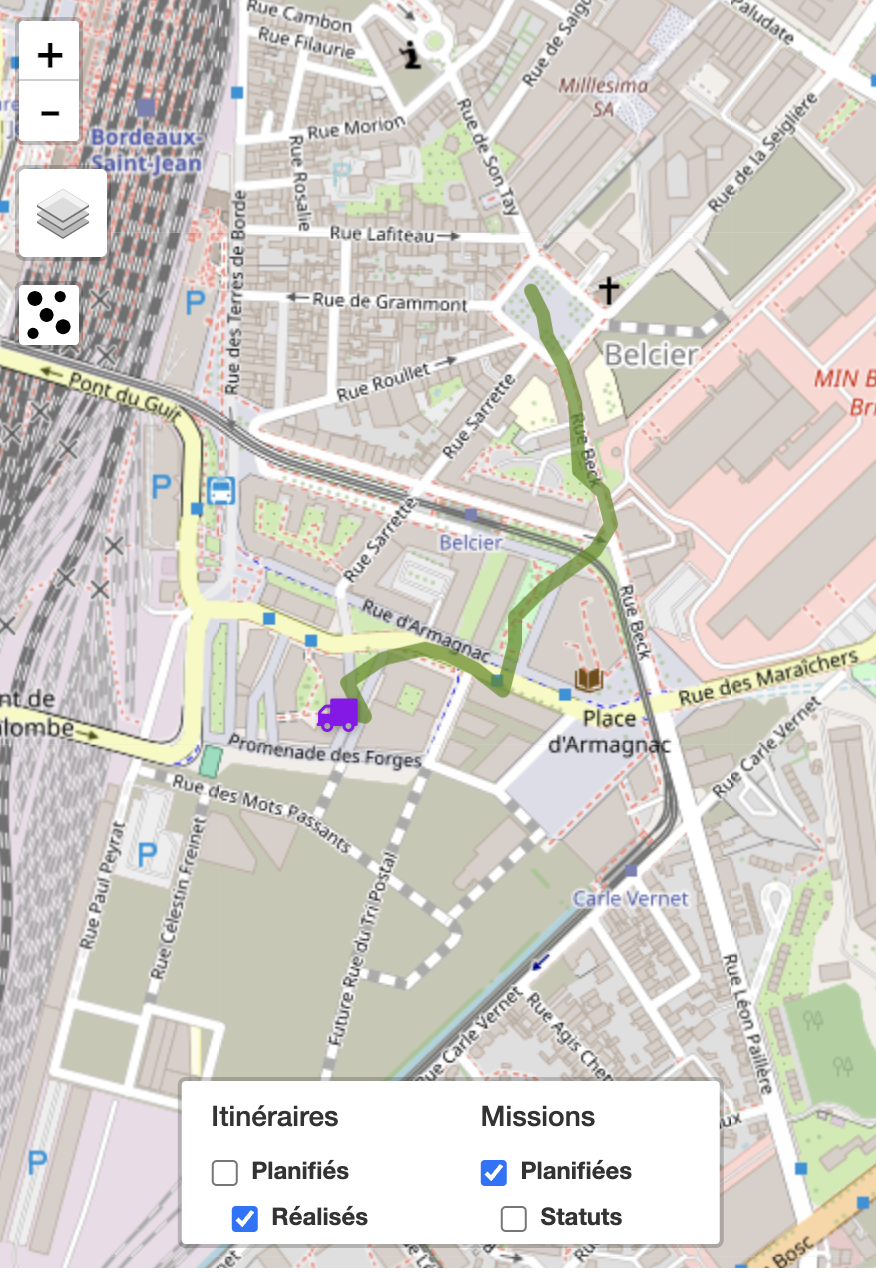
At the top of the route summary page, a button is available which, when clicked, displays a map background:
- the delivery points of the missions that make up the route,
- the numbering of missions in the chronological order of planning,
- the management of point clusters when zooming in and out,
- from an internationally dimensioned map background,
- with dark and light modes,
- and handling the use case of no connection and no network
Notifications
Route
If the user has agreed to receive notifications in the mobile app, they can receive two types of notifications:
- route changes,
- and mission status changes.
Drivers are notified of any changes to an element of their route by their manager:
- mission,
- labels,
- times,
- names,
- deliverable units, etc.
These notifications are received by the mobile app when it is open. The user can view a "push" notification otherwise, view them from the "Notifications" menu.
For any mission status update by the planner, the driver will be notified. They will no longer be able to change the status afterwards.
Be aware of the mode used on the smartphone, as it may mute notifications from the mobile app.
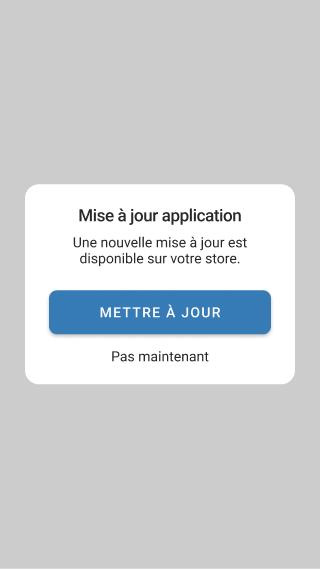
Mapo Driver Version
If the user logs into the mobile app, and it detects that the version used is not up to date compared to the one available on the iOS and GooglePlay stores, a pop-in will appear prompting the user to update it or to do so later.
This notification pop-in will be displayed once a day until the user updates their app.
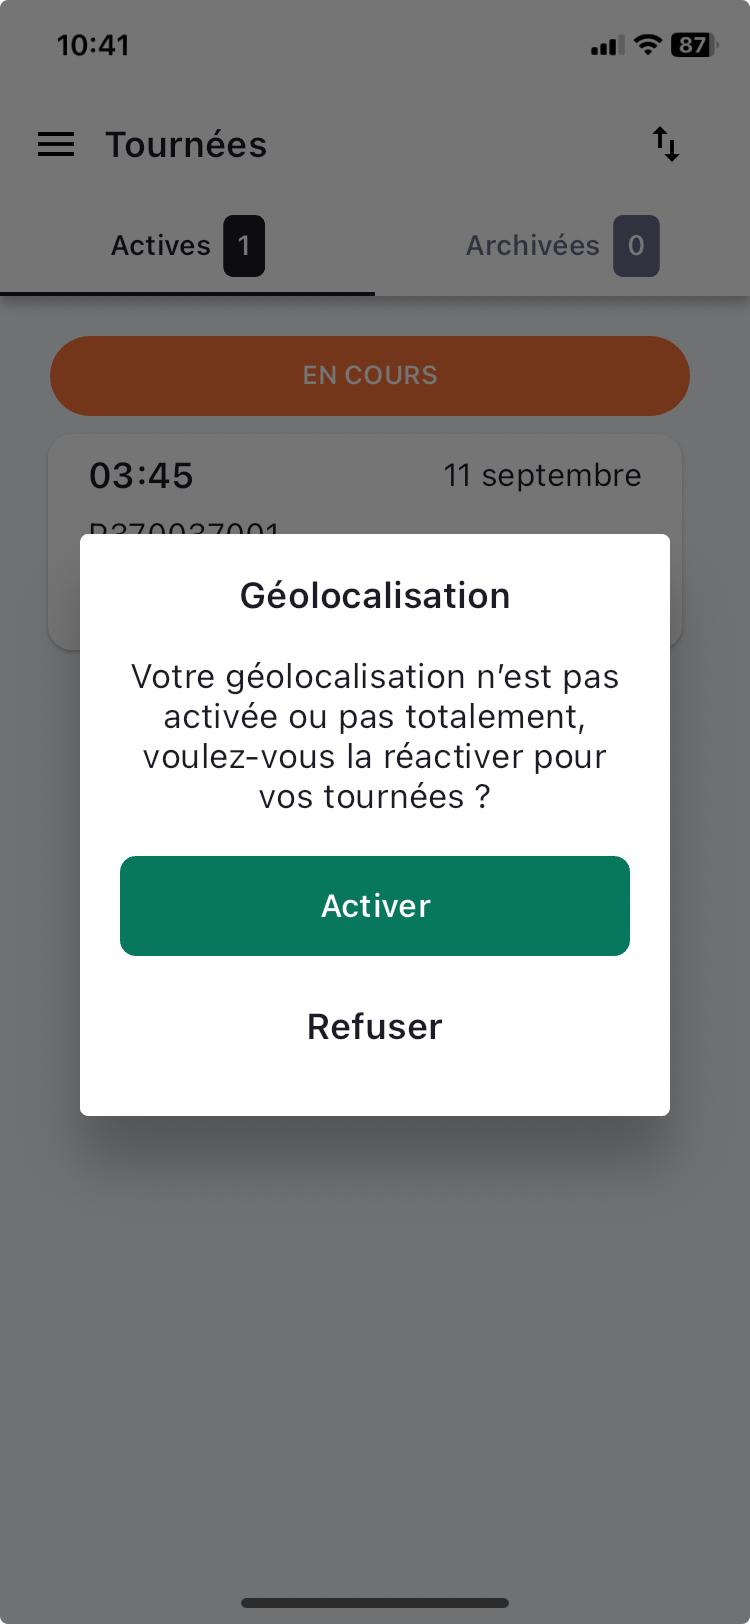
Geolocation
Upon user login, if my permissions and authorisations related to geolocation are disabled, a pop-in appears to alert the user.
Upon login, a detection is undertaken to identify:
- if location access is enabled in the phone settings,
- if access permission to the position is enabled for the Mapo Driver app,
- and if precise position access permission is enabled for the Mapo Driver app
The pop-in appears once a day as long as geolocation is not fully enabled.
Mission Mapping
The Mapo Driver mapping displaying the missions of a route is provided by Open Street Map (Open Source contributor).
The map is accessible from the route summary (information button represented by an "i") from the screen listing the missions, as well as from the screen presenting the details of a mission.
The map displays all the points (markers) of a route. A mission status is attached to these markers and is updated according to the driver's actions.
A path (polyline) can also be found between each of these points. By clicking on one of these, the driver can view:
- the status,
- the client's name,
- the postal address of the mission,
- you can click on "Mission Details" to switch back to the mission details page,
- and view the units and quantities transported on the mission.
By clicking on the button at the bottom right, the user switches to the route summary.
Any modification to an ongoing route made by the manager will result in an update of the mapping.
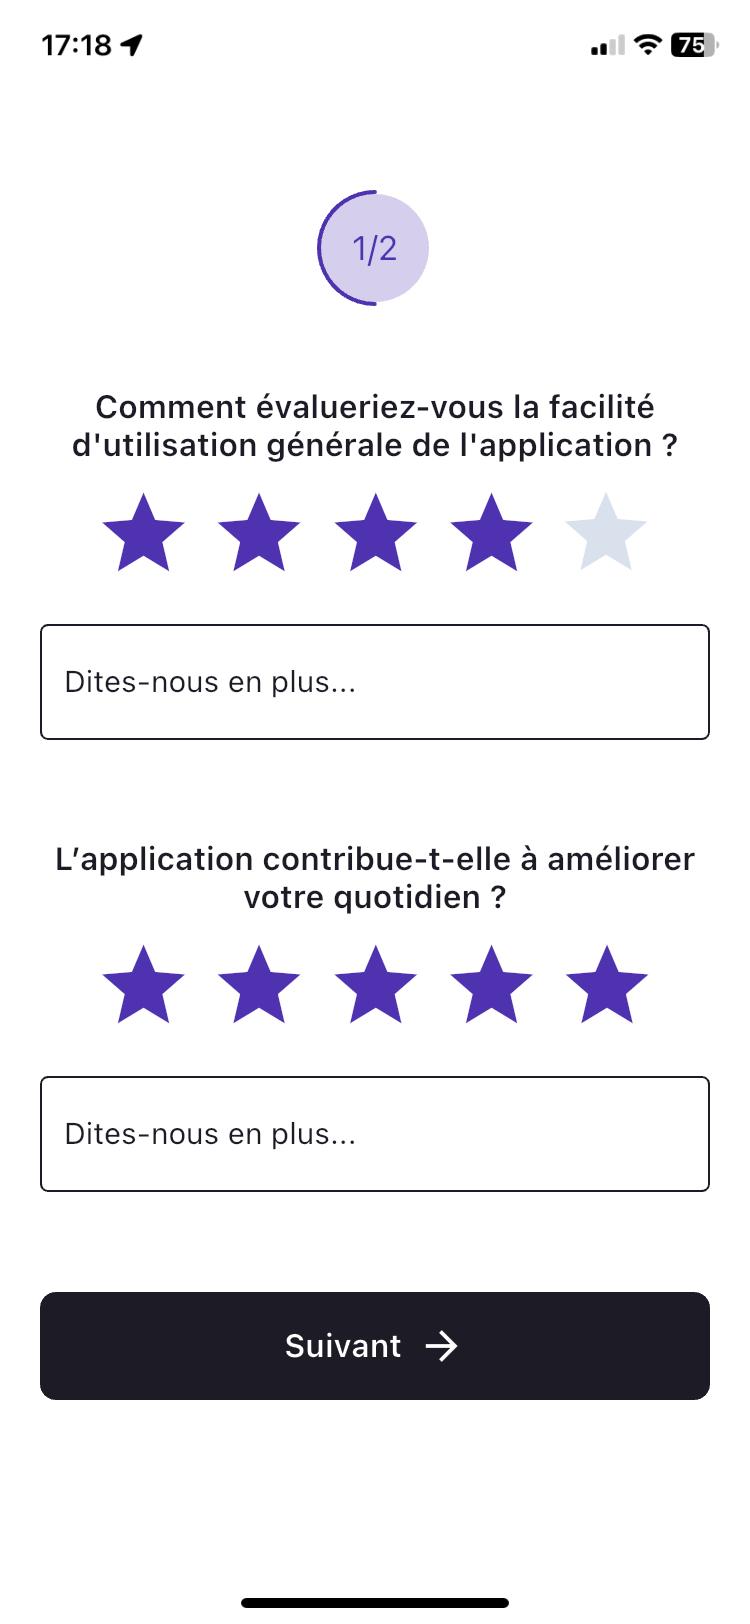
Survey
Mapo Driver ensures its use is constantly best suited to the drivers' daily needs.
That's why, almost quarterly, we present questions to gather and analyse feedback, and continuously improve the mobile app.
Accessible from the mobile app menu under "Give your feedback", this survey consists of short questions with a star rating system. Additionally, there's the option to leave a comment to supplement the given rating.
A red dot appears in the menu as long as the user hasn't answered the questions. Once answered, the dot will disappear until the next questionnaire is created.
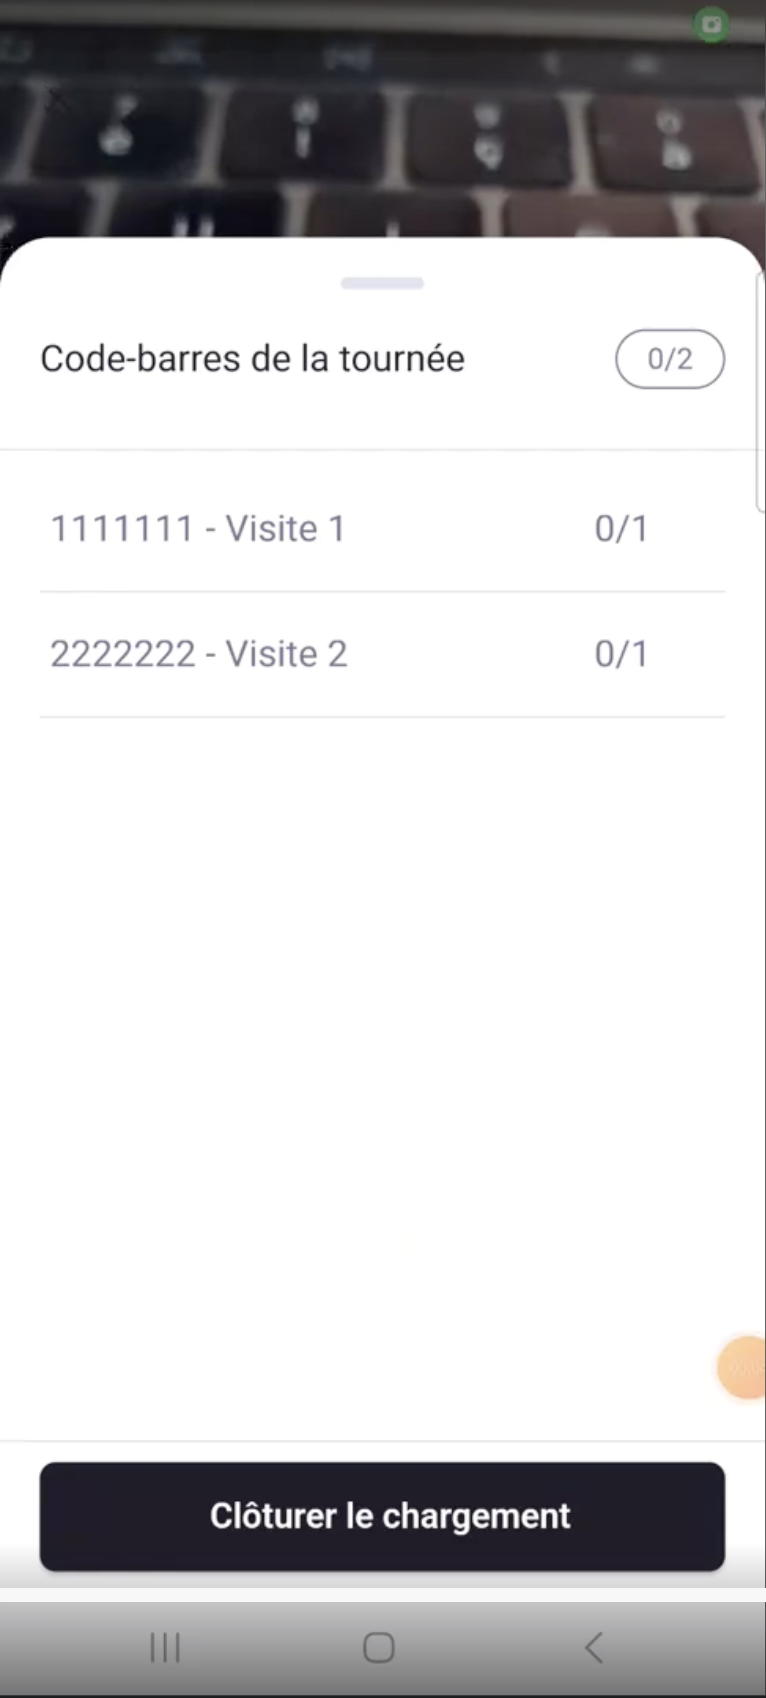
Mass pick up
The mass pick up solution has been developed to address issues of time spent, individual collection, low loading efficiency, and finally the lack of control during loading, and between loading and delivery.
Configuration
The Mass Pick up is a solution not available by default in Mapo Driver, and can be activated upon request.
It can be activated either for loading the route only, or for both loading and deliveries.
Description
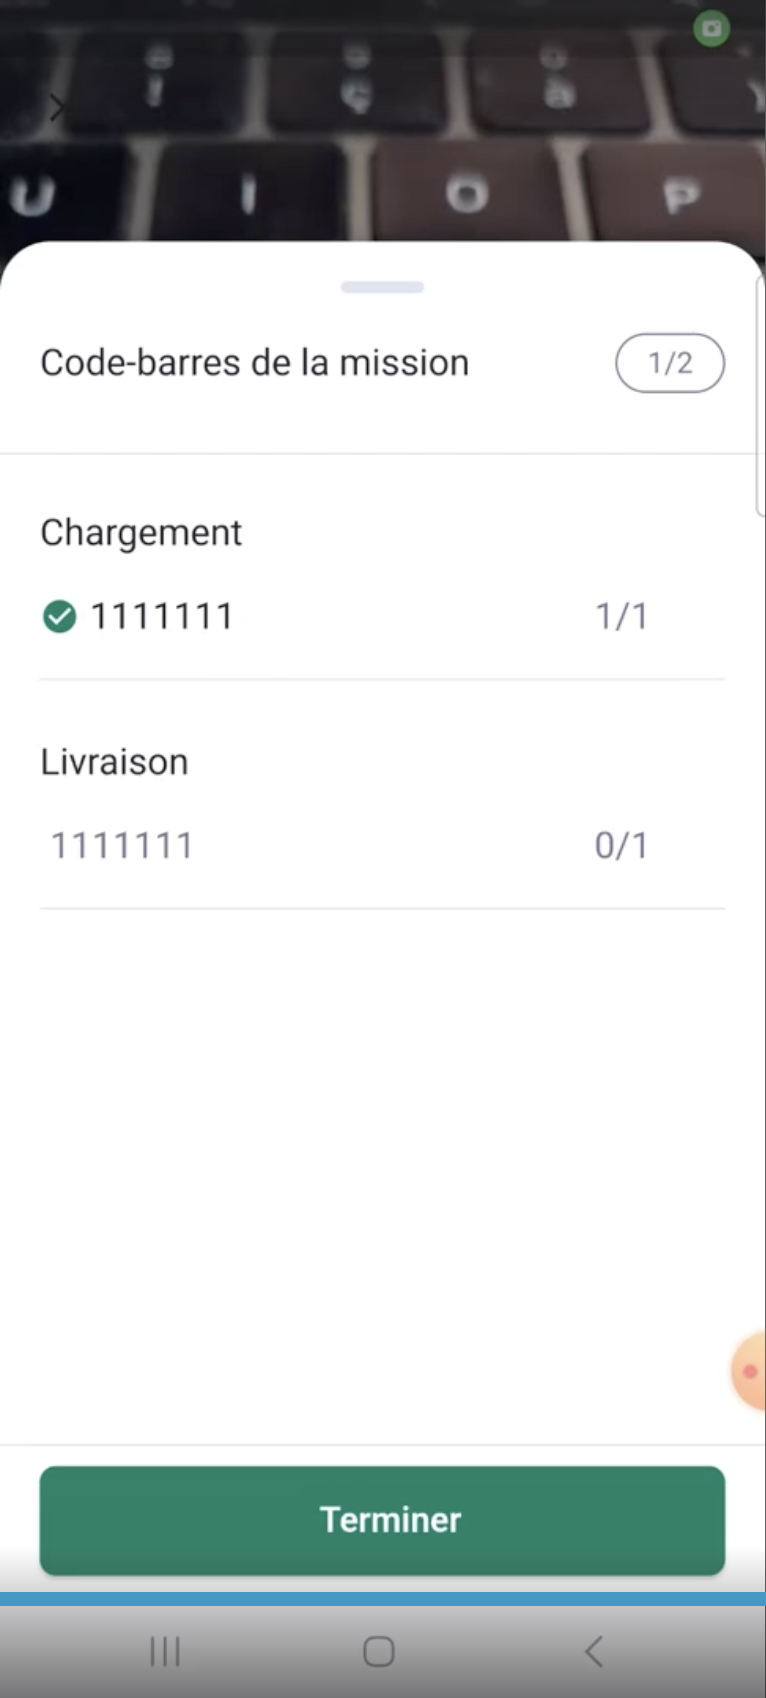
When clicked from a route, Mapo Driver automatically opens the barcode scanner to save the driver time.
From the barcode, the driver can view all the barcodes for their route that need to be delivered. One barcode corresponds to one delivery.
When a barcode is scanned, it is identified and linked to a mission. Upon closing the loading or the scanner, the status of the mission in question is then automatically updated to the next status (e.g., "To do" to "Loaded").
There can be several different barcodes, always following the model of 1 barcode for 1 mission.
If a parcel could not be scanned during loading, the driver has the option to either check again or report the missing parcel to their manager.
Once the loading is closed, when the driver hands the parcel to the customer, they can then view the barcode of the parcel scanned during loading on their mission.
They must scan it again to validate the delivery. If this is done, the status of their mission will automatically change to a final status.
If the parcel checked during loading encounters a problem during transport and cannot be delivered to the customer, the driver can report the parcel issue to their manager again.
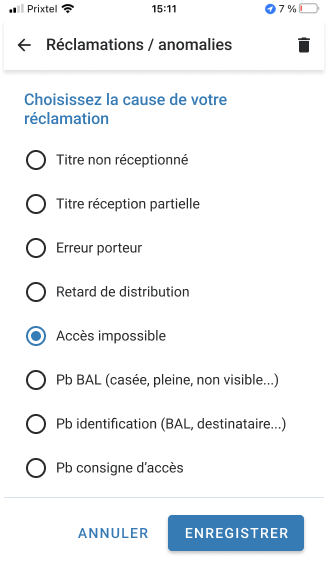
Geofencing
The geofencing solution has been developed to address issues of forgetting or delaying the update of a final status on a mission. This lack of final status update leads to misunderstandings regarding the tracking by the manager or the end customer, and generates frustration.
Configuration
Geofencing is a solution that is not present by default in Mapo Driver and can be activated upon request.
Description
The automatic update of final statuses only concerns missions and not the departure and arrival depots.
By default, the radius operated by geofencing is 150m. It can be modified according to each use case. Automation occurs when the driver exits their radius, not when they enter.
During the first use, Mapo Driver will alert the driver through a message offering to automatically change the status to a final state. If the driver ticks to confirm the automation of the update, then this message will no longer appear.
If the driver exits their mission area, and Mapo Driver detects that there is no final status set, then Mapo automatically applies the status. Subsequently, the status of the next mission is automatically updated to a "next" status. If these statuses are up to date, then if a setting for sending an SMS to the end customer is configured, the SMS is authorised to ensure the relevance of the information.
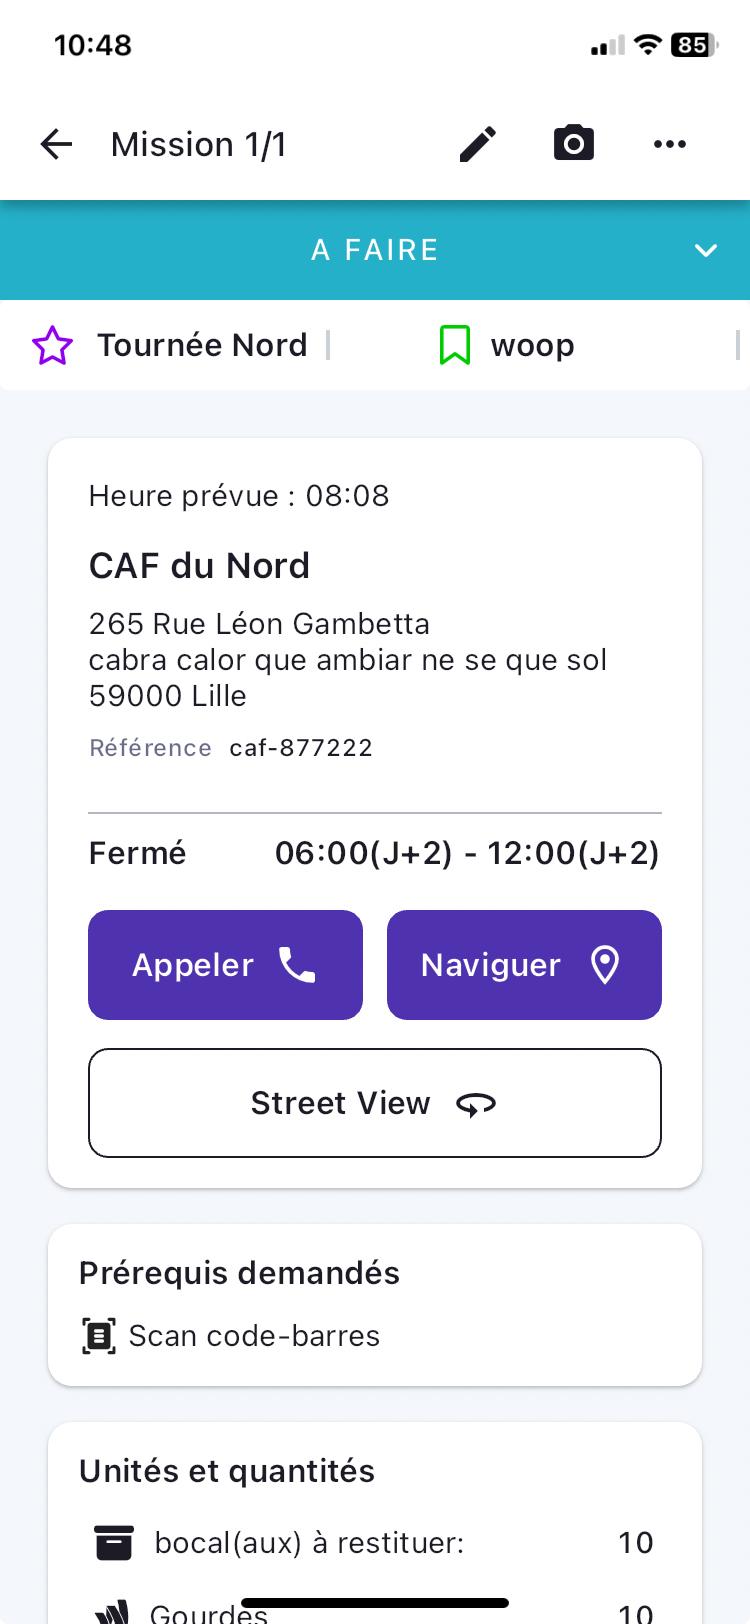
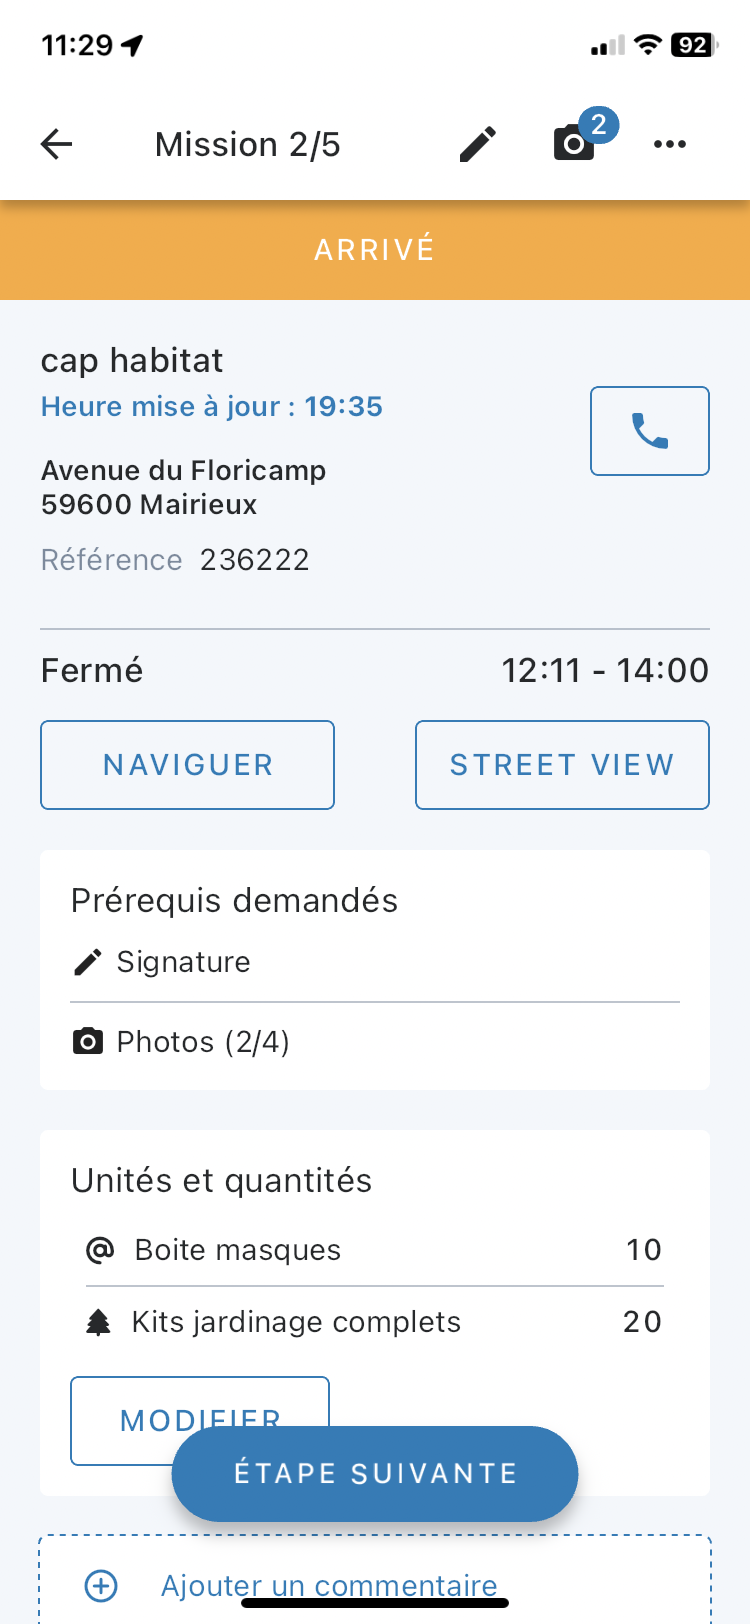
Mission Details
By clicking on a mission from the route screen (see above), you can access its various details.
Depending on the settings enabled for you, you will be able to access different features.
These allow you to manage and track missions in real-time.
Initially, you will find a description of the mission with:
- a delivery status,
- a label,
- the scheduled time of the mission,
- the destination address,
- and a comment.
Next, you can:
- navigate to the address using third-party apps installed on your devices (Waze, Citymapper, and Maps, Google Maps),
- call the recipient directly,
- enter the signature and photo prerequisites for delivery,
- and optionally add a comment.
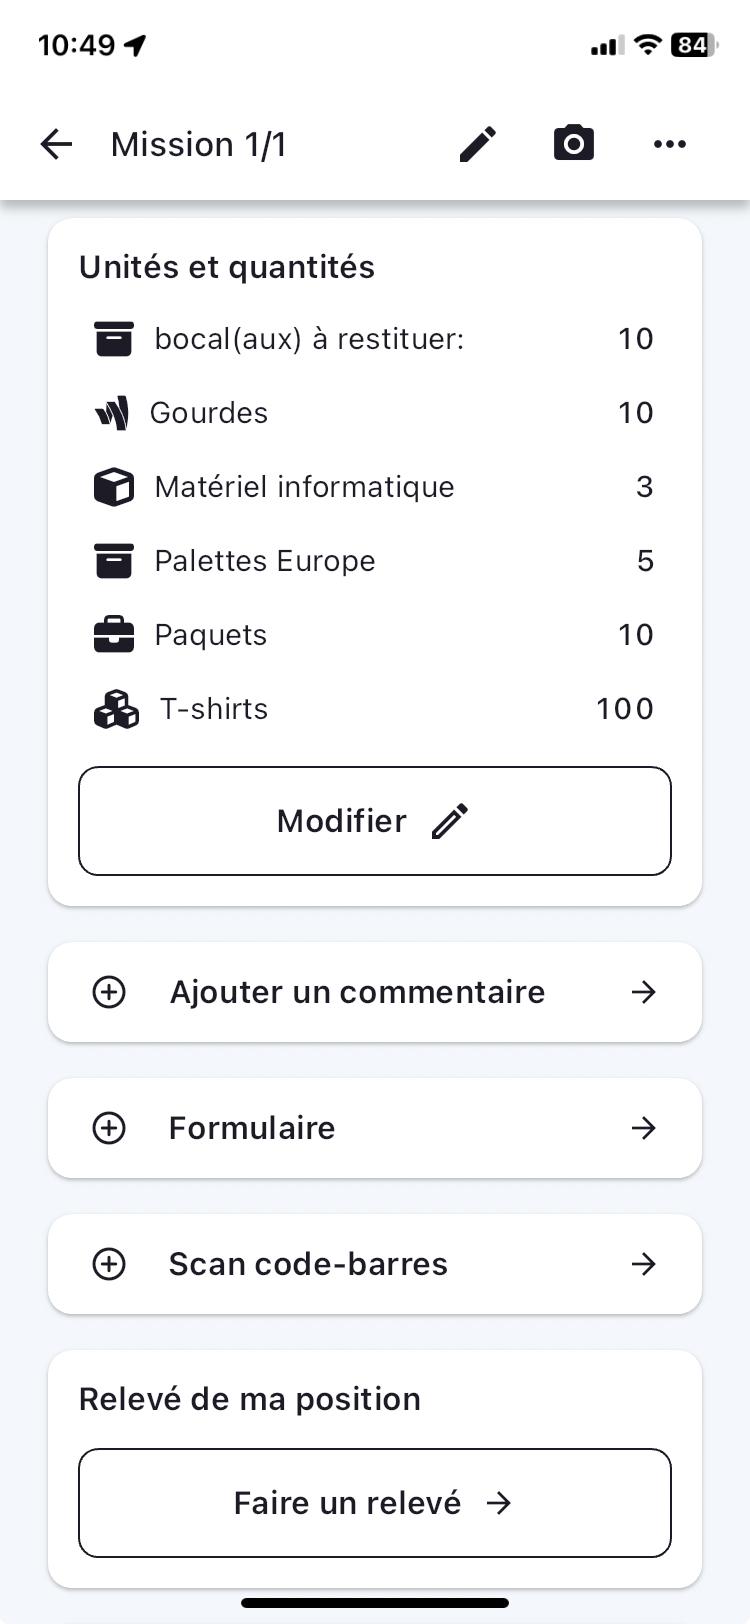
Finally, by scrolling down, you can access additional elements related to the mission such as its details and its units & quantities.
From the "Edit" button, you can:
- search by unit,
- save the changes made,
- or reset them.
Mission Labels
From the Mapo planning tool, you can highlight informative characteristics of the mission.
These will help your drivers better understand the expectations or context of their mission among several in their route.
You can add as many as you like, and you can rename them and choose the colour of your choice.
These labels appear at the top of the mission details page.
Time Slots
From the Mapo planning tool, you can enter one or two time slots allowing the driver to view them to deliver efficiently and avoid waiting or re-delivering.
If nothing is entered, the app will display nothing. Depending on the time on their phone, if the driver is:
- within the time slot, they will see "Open",
- outside the time slot, they will see "Closed".
View a Document
From the Mapo planning tool, the driver manager can add a URL of a document that the driver can view from the mission details screen.
When this URL is entered and sent to the driver, they just need to click on it to view the document in "Additional Information".
They can zoom in or out to better see the available information.
The shared document can be in any format: .pdf / .xls / .word / .ppt etc.
Status Management
All the statuses that make up a mission are called a 'workflow'. This allows the work context of the couriers to be adapted according to the expressed needs.
There is a standard workflow with simplified status management to update, and a workflow that can be customised in several ways.
A mission status can be updated either:
- by clicking on the coloured banner at the top,
- or by clicking from the button at the bottom.
The choice of status update management is configurable according to client preferences.
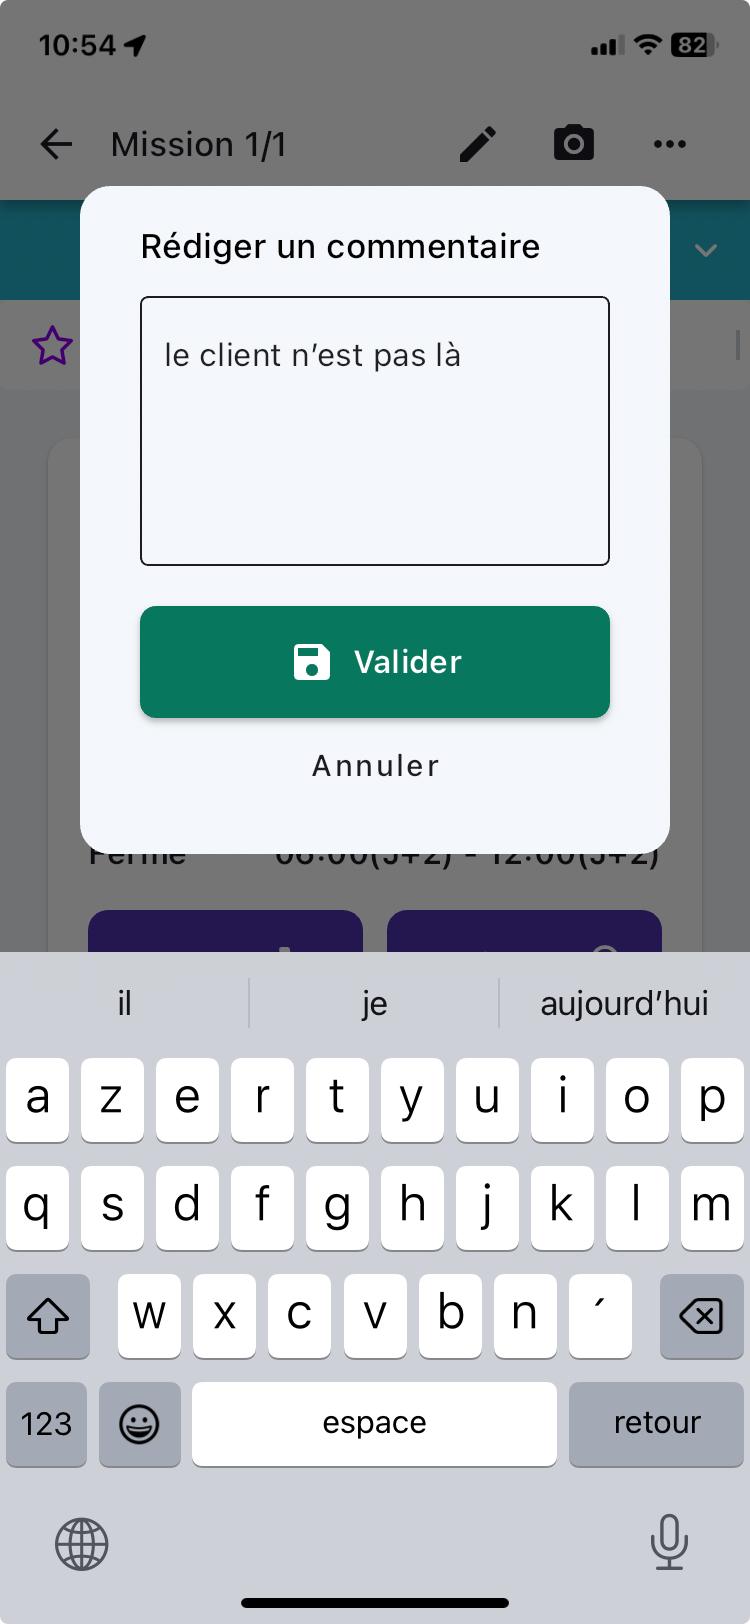
Comment
From the mission details screen, by clicking on the "Add a comment" box, a pop-up will appear allowing you to leave a comment on the current mission.
Returning to the mission details screen, after entering your message, you will notice a small tick on the "Comment" box indicating that your message has been successfully recorded.
You can at any time during your route, return to it to modify or delete it as you wish.
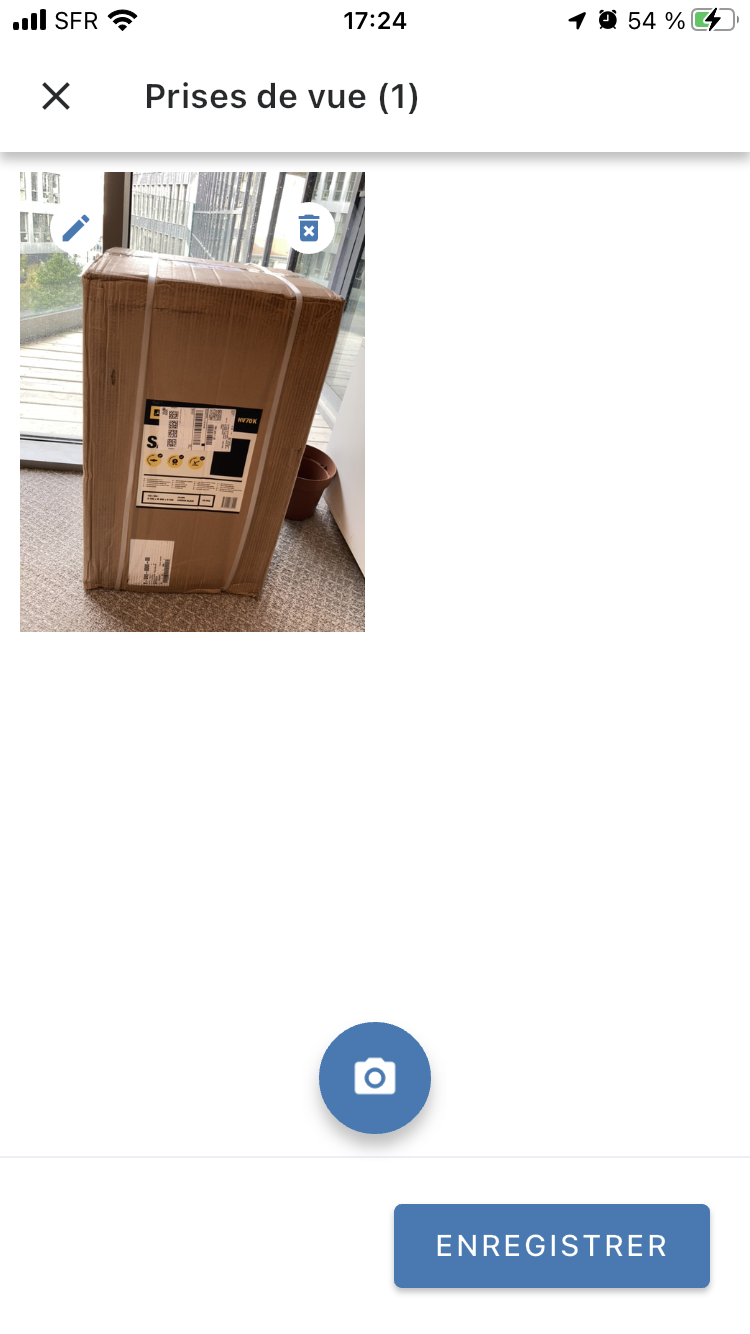
Photos
At the top right of the mission details screen, you can access the "self-service" photo capture by clicking on the camera, to provide proof of delivery for your mission, or even for an anomaly, for example.
Returning to the mission details screen, after entering your photo prerequisite, you will notice a small tick on the "Photo" box confirming that your photo has been recorded.
You can add a perspective by clicking on the pencil at the top left on the taken photo.
Simply swipe your finger to add more information to the photo.
Click the back arrow to erase your previous edit.
Click the save button on the far right to save your photo with the edit.
Finally, photos are timestamped with the date and time of capture. The timestamp is automatically applied after the photo is taken.

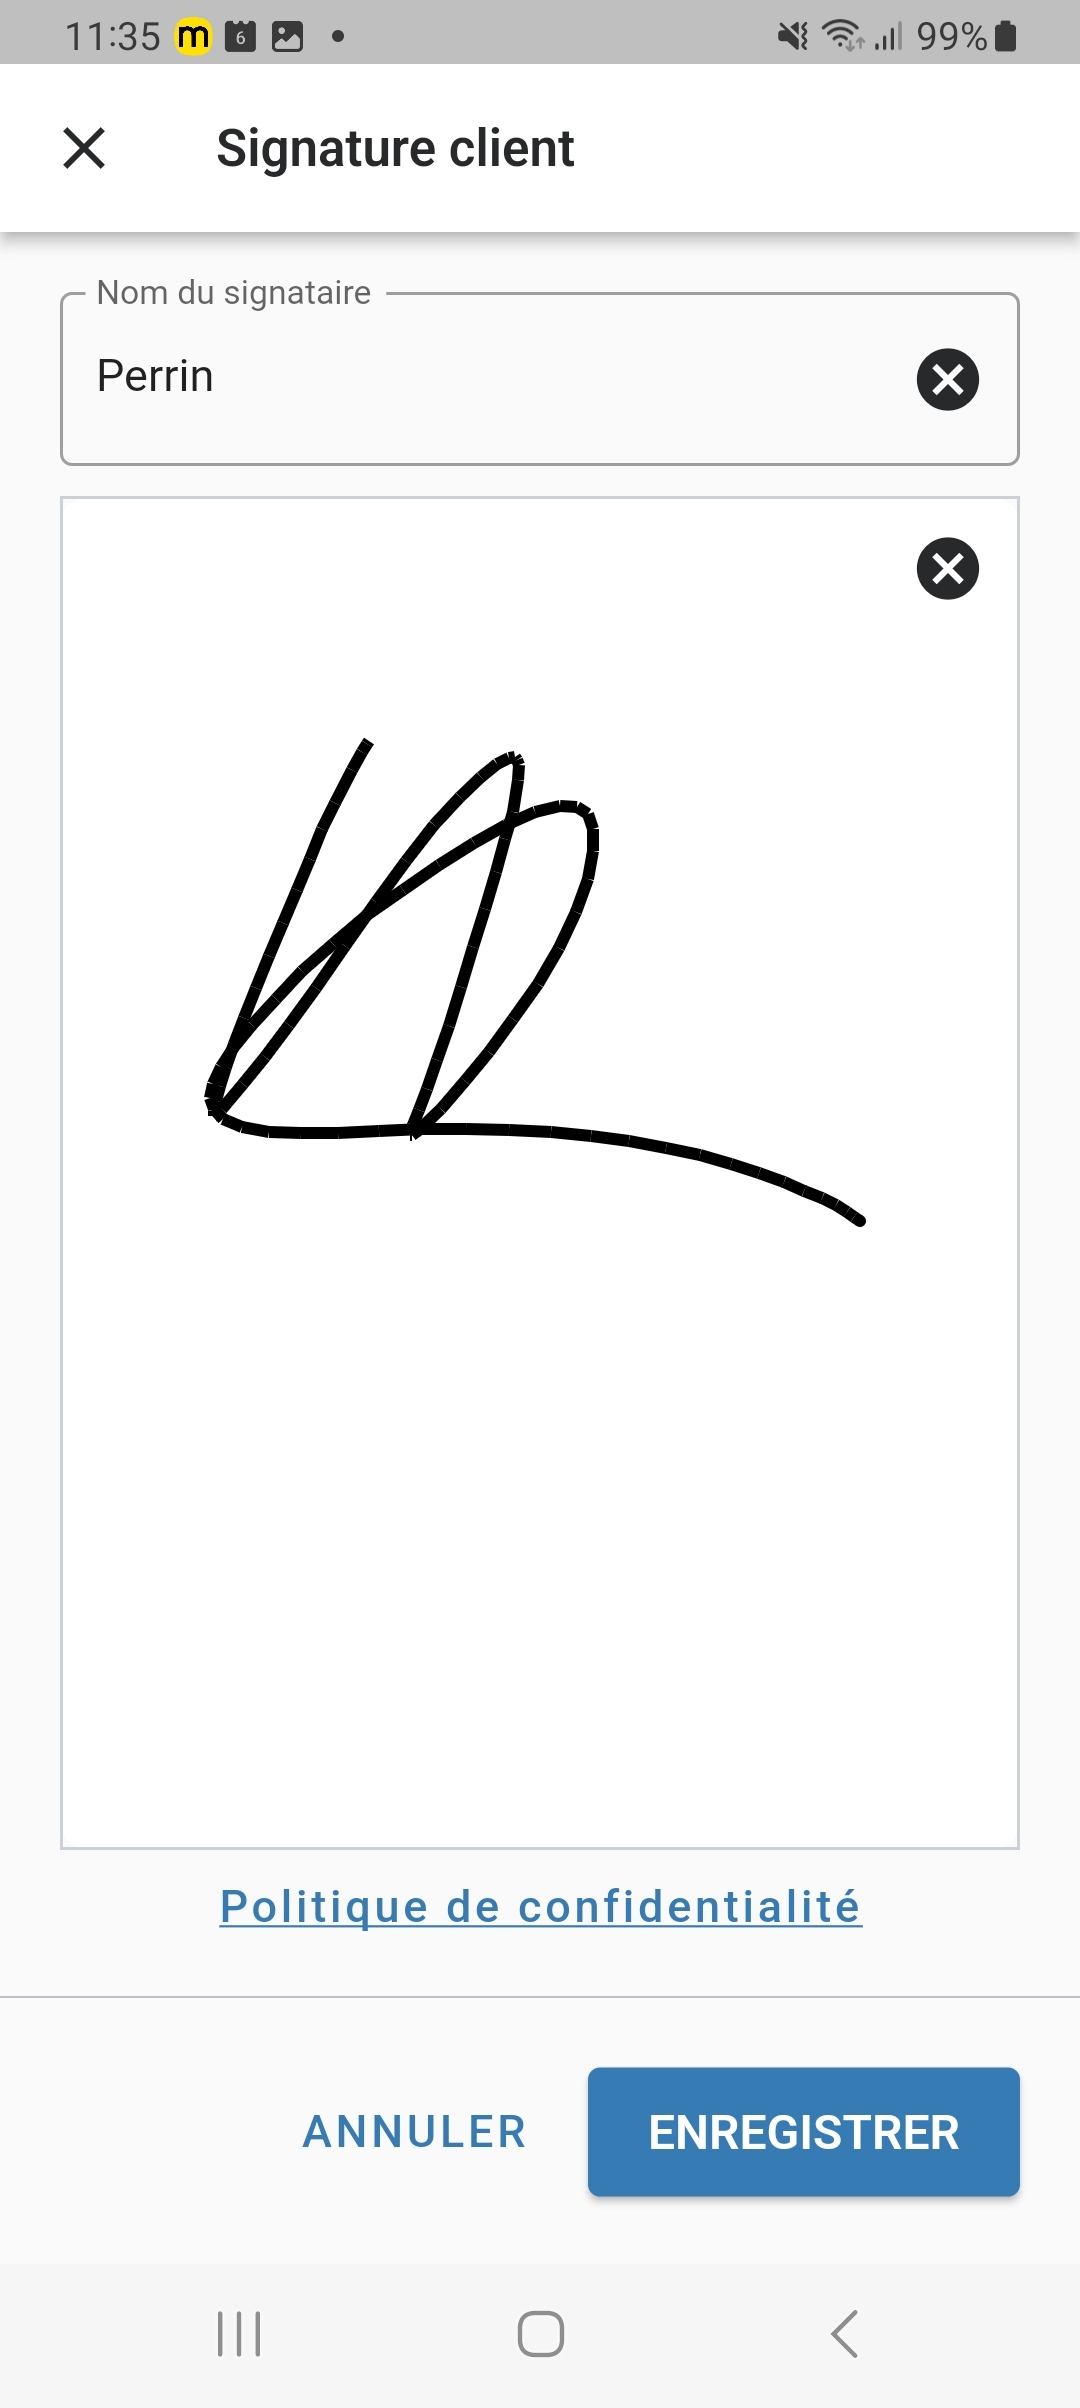
Signatures
At the top right of the mission details screen, you can access the signature by clicking on the pencil, to provide proof of delivery for your mission.
To save time, the client's name is pre-filled. This can be deleted if needed. You just need to enter the signature and save.
Returning to the mission details screen, after entering the signature, you will notice a small tick on the "Signature" box indicating that the signature has been successfully recorded.
Finally, these are timestamped with the date and time. The timestamp is automatically applied after the signature.
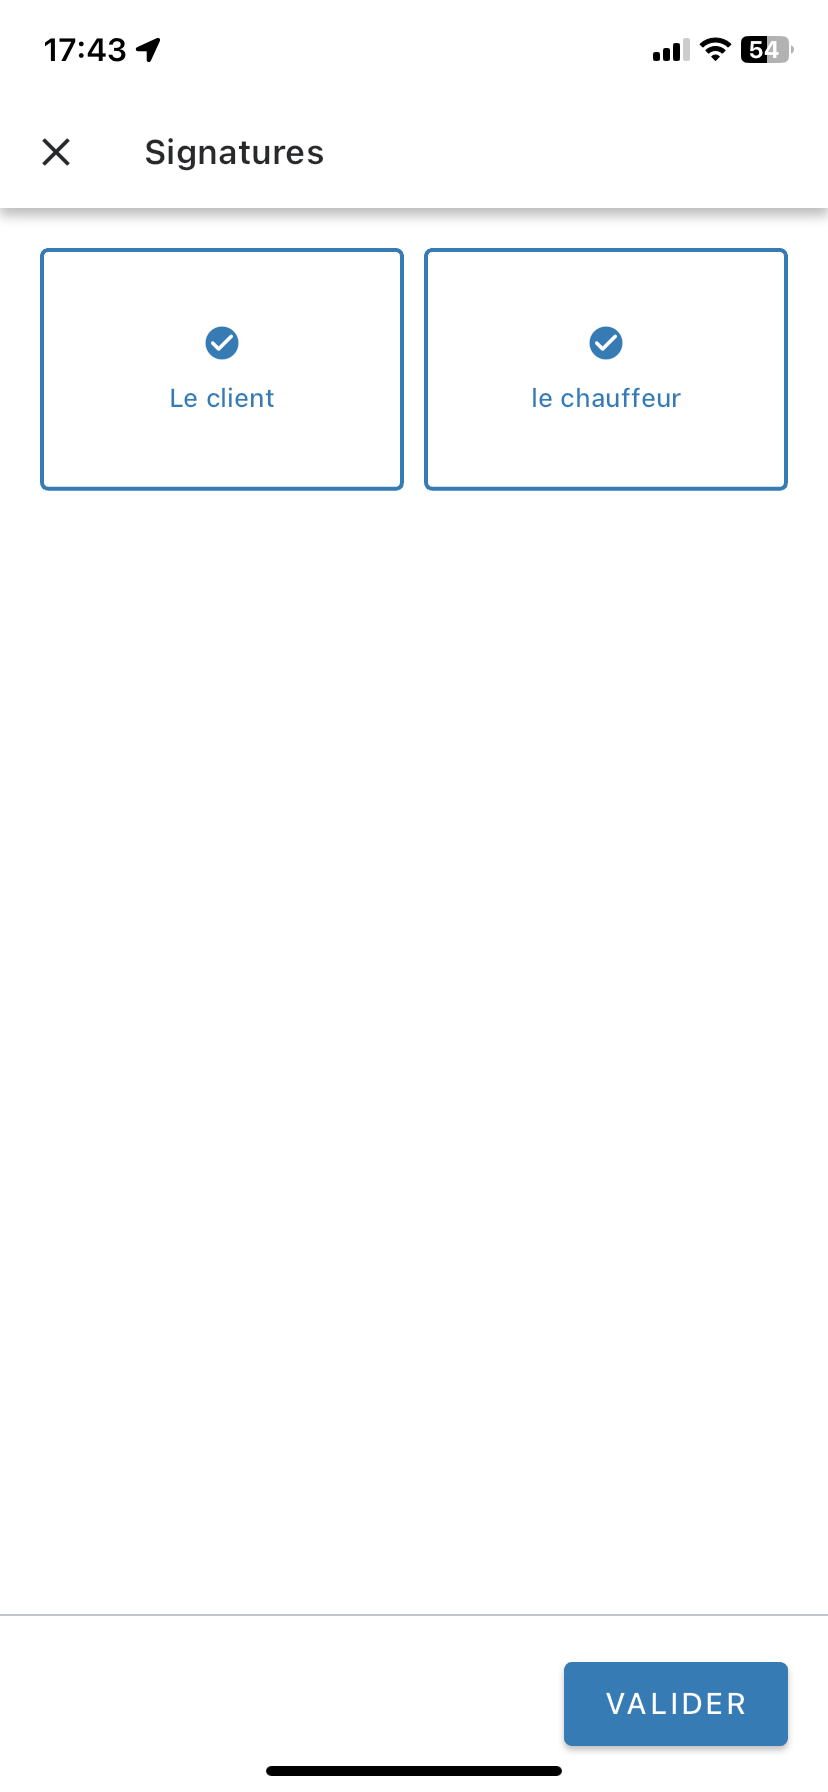
Multi-signatures
From the mobile app, you can set up multi-signature to allow both the client and the driver to respectively add their signature.
To save time, the client's name is also pre-filled. This can be edited if needed. You just need to enter the signature and save.
Forms
They are accessible from the mission details screen. They can be set up as a mandatory prerequisite if needed.
If the mandatory form prerequisite is in effect, the driver must fill it out to change the status of their mission to "Completed". Otherwise, the mission status will remain "In progress" or change to "Anomaly".
Clicking on "Forms" will open a pop-up showing one or more forms that can be configured by a manager.
These forms can take different shapes according to your needs: feedback, anomaly reports, satisfaction, etc.
Additionally, they can be of different types: radio, checkbox, or text fields.
When a form is completed and saved, you will see a small tick on the mission detail screen confirming the form has been filled out.
Depending on the requirement, the form can be set up so that the responses are only numeric characters.
 $
$
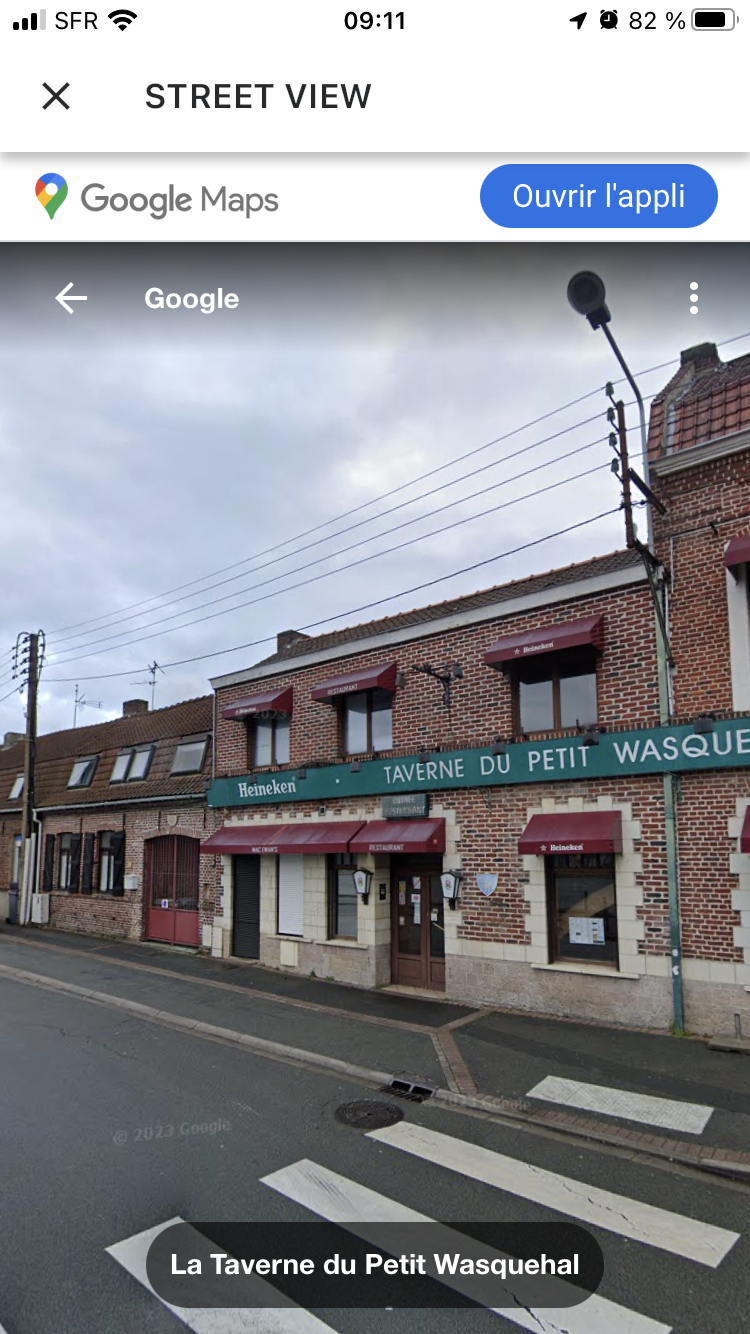
Street View
Clicking on the "street view" button will open Google Maps in the mobile app at the delivery address of the mission.
You can plan your delivery by visualising potential parking or vehicle access difficulties. Your delivery will be streamlined, saving you time and avoiding unpleasant surprises.
Clicking on the cross at the top left of the page will return you to the mission detail page.
Additional Information
Note! Custom fields will only be visible if the account administrator fills them in!
Custom fields appear in the "Additional Information" displayed on the mission detail screen.
You can fill in:
- a first field that consists of a title,
- and a second that allows you to write a description.
Additional information is only visible; it cannot be modified from the mobile app but only from the admin Mapo Web.
If the description is long, a "Display more" button will appear. Clicking on it will open a screen to show the full description.
Position Recording
You can record your position by clicking on "Record". The coordinates can be retrieved in the route reporting in the planning tool.
Position recording allows you to locate a suitable place or entrance for your vehicle if the original address does not permit it.
If your phone settings or geolocation do not allow you to record your position, a warning pop-up will guide you in completing your position recording.
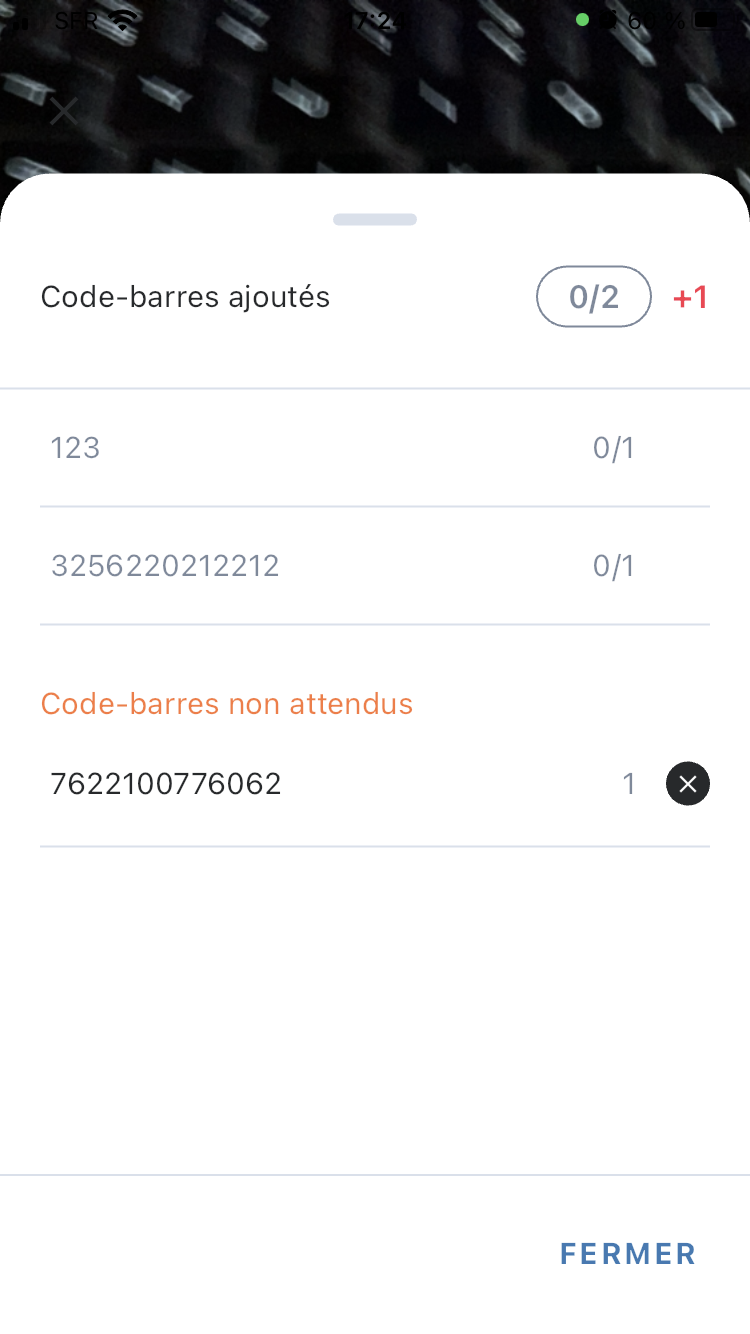
Barcode & QR Code Scanning
From the mission detail screen, you can scan barcodes and QR codes using your smartphone's camera.
When the scan identifies the desired barcode, a confirmation message will appear: "The barcode has been successfully added".
If a parcel's barcode is defective or the scan cannot identify it, you can click on the "pencil" to enter it manually.
You can see the number of scanned barcodes from the indicator. If you swipe the window upwards:
- you will see the serial numbers of the added barcodes,
- you can identify if the same barcode has been scanned multiple times,
- you can delete scanned barcodes by clicking on the cross.
For barcodes expected to be scanned, if their respective parcels encounter a problem, the user can complete their scan action and report the issue to their supervisor.
The scan supports the following formats:
|
|
Expected Barcodes
On a mission, you can identify the expected barcodes that your manager has set up from their route planning tool.
If you scan the barcode associated with the expected one, you will notice a small tick confirming that the expected and scanned barcode is valid.
If you scan a barcode that is not associated with those expected, a confirmation pop-up will appear.
You can either "abandon" to delete your barcode scan or "keep" it if you wish to retain it. In the latter case, the unexpected barcode will be displayed in a menu.
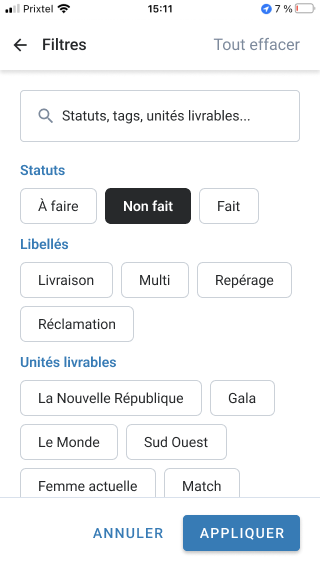
Mission Filters
The filters are directly accessible from the page listing the missions of a route.
The page presents a search bar as well as all the characteristics specific to the missions of the route that the driver must complete:
- statuses,
- labels,
- and deliverable units.
When the driver starts typing in the search bar, the page filters the statuses, labels, and deliverable units in line with the driver's search.
The driver can also use the filters that work like buttons, activating the filter as needed.
Clicking on "Apply", the mobile app will display the results of the selected filters. Additionally, the driver is informed through a badge of the number of selected filters.
Finally, the driver can access the details of their filtered missions afterwards. They can interact with the various features available from the mission detail page while remaining in this context of filtered missions.
Mission Prerequisites (POD)
The configuration of mandatory supporting documents to be provided at a mission's status can be set up.
Photos, signatures, comments, forms, or scans can be implemented to require the driver to provide these elements to justify updating a status. Without providing these requested elements, the mission's status will remain at the previous status.
The configuration can be set up according to the need from 1 to a maximum of 5 proofs. If more than one supporting document is configured, the driver must complete the documents of one proof to proceed to the next.
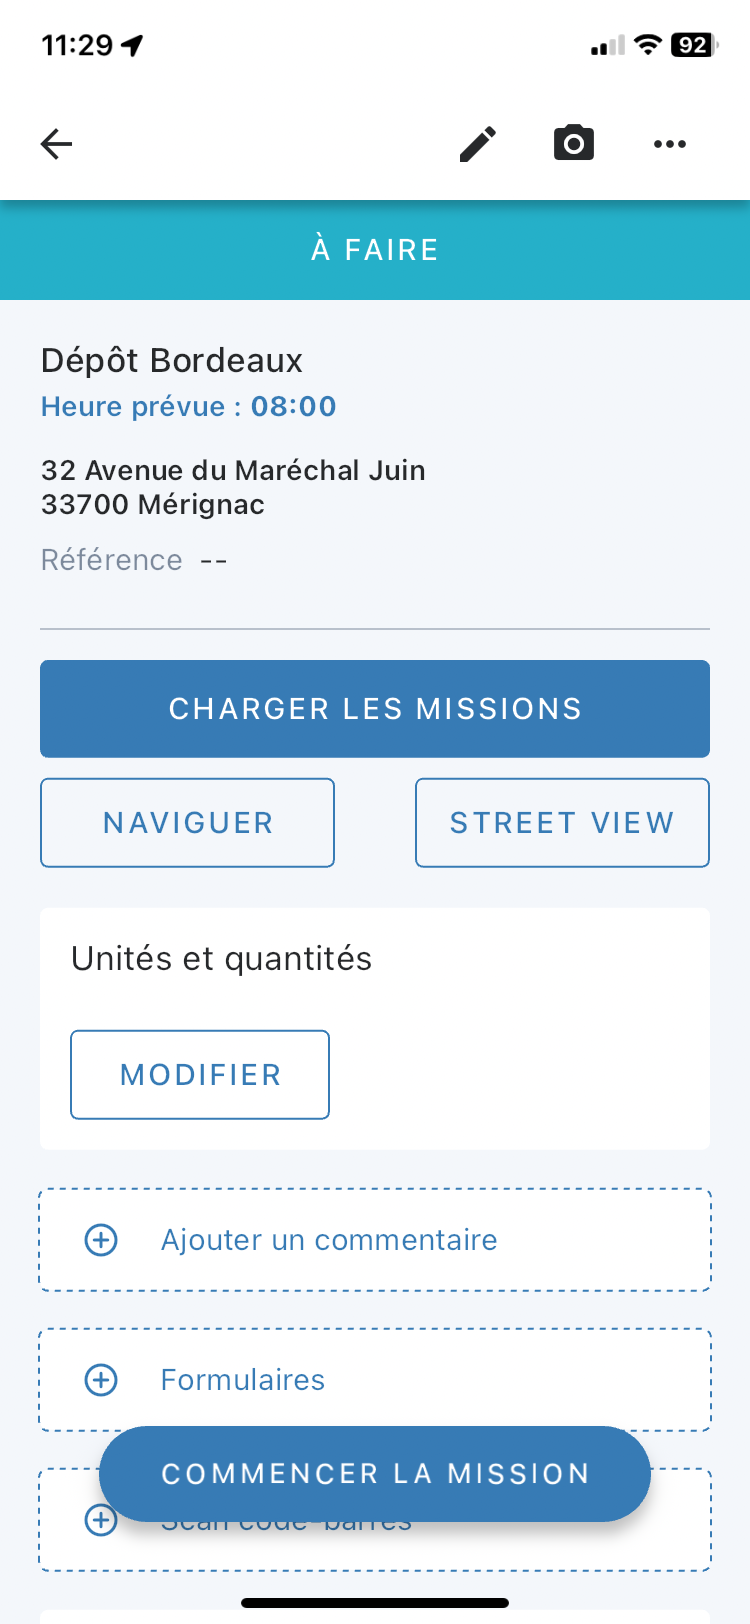
Load Management
When the load management configuration is activated, the user can find the "Load Missions" button from the departure depot page.
Clicking this button takes you to the load management page for all the missions that make up the route.
The user can return to the loading page as many times as needed.
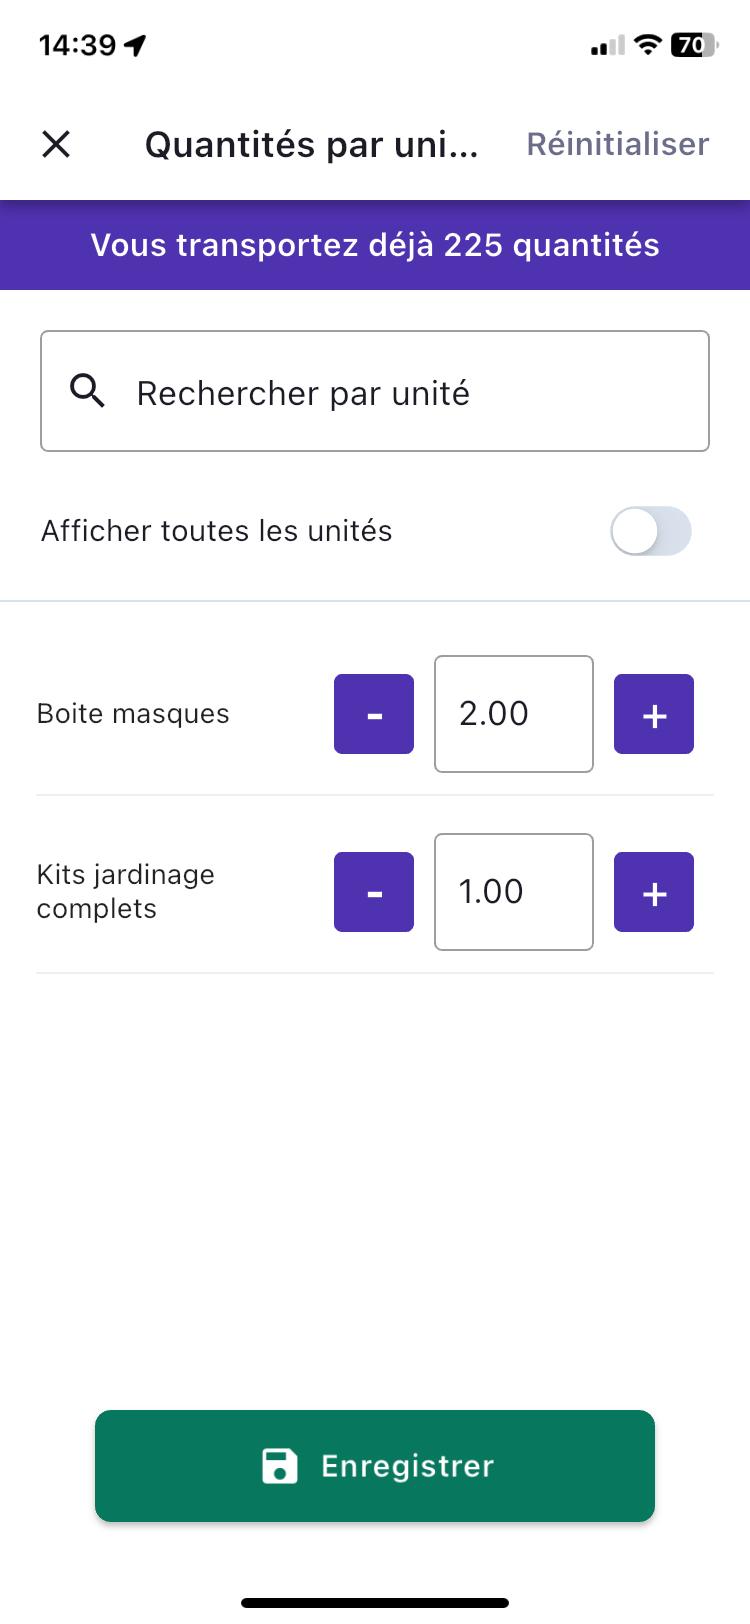
Addition of Declared Quantities
From the mission detail page, clicking "Edit" on the "Units and Quantities" widget takes you to the edit page.
Here, you can view the total sum of quantities transported in your truck to ensure it stays within its capacity limit.
The total transported sum updates automatically for any quantity changes made to the mission after clicking the "Save" button at the bottom.
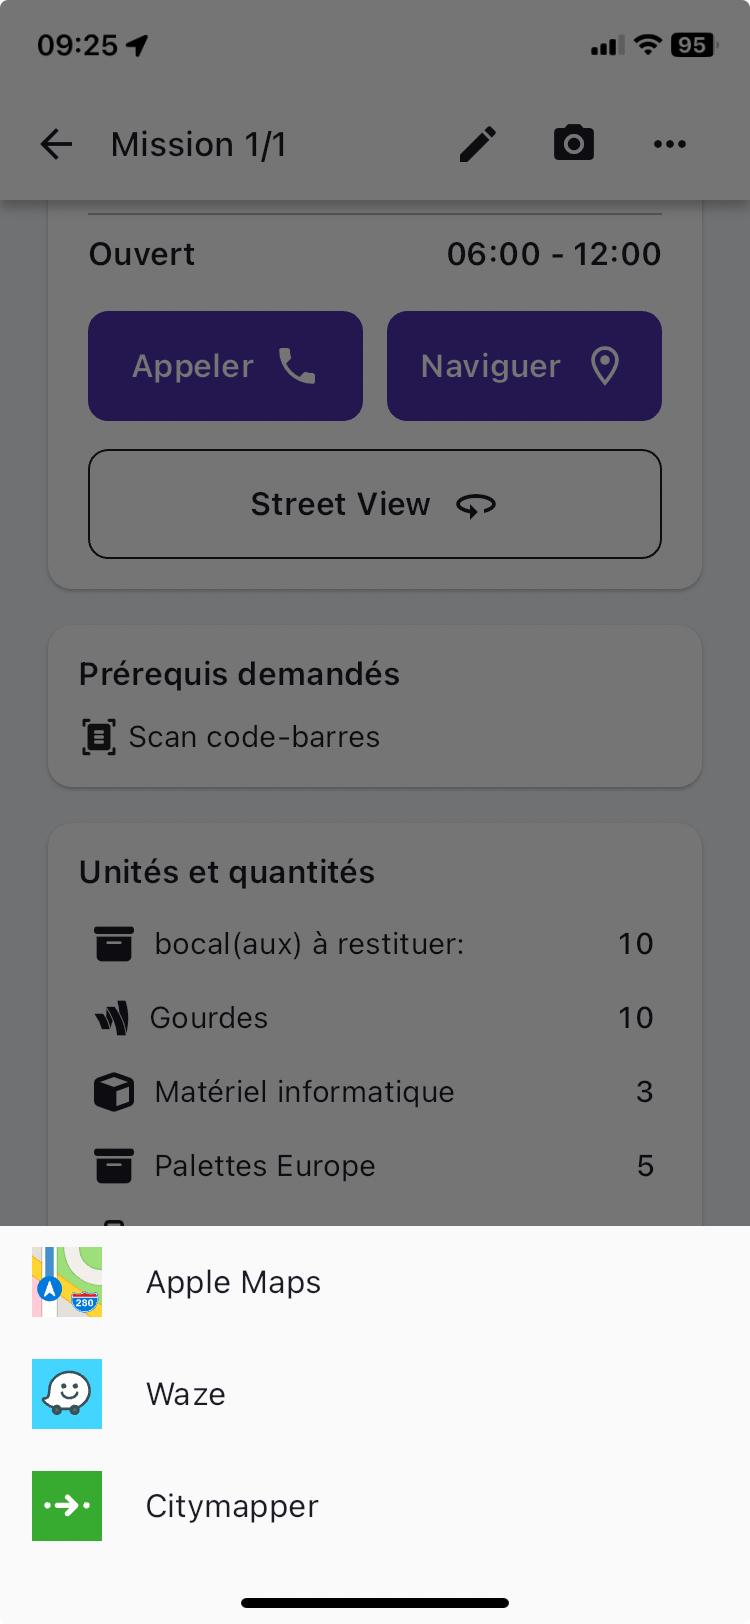
Navigation Apps
For more simplicity for users, Mapo Driver has created a dynamic with the most common navigation apps.
Clicking "Navigate", depending on the type of phone used (Android or Apple) and the navigation apps downloaded on the phone, Mapo Driver will suggest these.
Clicking on one of these apps automatically redirects the user to the selected one, and the itinerary will be automatically calculated from the GPS coordinates of the mission's address.
Currently, we list all the following navigation apps: google, googleGo, amap, baidu, waze, yandexMaps, yandexNavi, citymapper, mapswithme, osmand, osmandplus, doubleGis, tencent, here, petal, tomtomgo, roadlords, and Nav XL.
Finally, we have partnered with Nav XL to allow the driver to enjoy specialised navigation services for Heavy Goods Vehicles.
Application Version History
| Versions | Release Date |
| 1.14.0 | 04 March 2025 |
| 1.13.2 | 26 February 2025 |
| 1.13.1 | 25 February 2025 |
| 1.13.0 | 24 February 2025 |
| 1.12.2 | 10 February 2025 |
| 1.12.1 | 10 February 2025 |
| 1.12.0 | 03 February 2025 |
| 1.11.3 | 14 January 2025 |
| 1.11.2 | 13 January 2025 |
| 1.11.1 | 16 December 2024 |
| 1.11.0 | 12 December 2024 |
| 1.10.1 | 25 November 2024 |
| 1.10.0 | 25 November 2024 |
| 1.9.0 | 18 November 2024 |
| 1.8.4 | 04 November 2024 |
| 1.8.3 | 28 October 2024 |
| 1.8.2 | 10 October 2024 |
| 1.8.1 | 03 October 2024 |
| 1.8.0 | 16 September 2024 |
| 1.7.3 | 6 September 2024 |
| 1.7.1 | 18 July 2024 |
| 1.7.0 | 15 July 2024 |
| 1.6.3 | 27 June 2024 |
| 1.6.2 | 11 June 2024 |
| 1.6.1 | 27 May 2024 |
| 1.6.0 | 02 May 2024 |
| 1.5.38 | 25 March 2024 |
| 1.5.37 | 15 March 2024 |
| 1.5.32 | 26 February 2024 |
| 1.5.0 | 07 February 2024 |
| 1.4.0 | 08 January 2024 |
| 1.3.0 | 13 December 2023 |
| 1.1.0 | 16 November 2023 |
| 1.0.0 | 07 November 2023 |
| 0.12.0 | 02 October 2023 |
| 0.11.4 | 30 August 2023 |
| 0.11.3 | 29 June 2023 |
| 0.11.0 | 22 May 2023 |
| 0.10.0 | 07 April 2023 |
| 0.9.3 | 04 April 2023 |
| 0.9.2 | 23 March 2023 |
| 0.9.1 | 20 March 2023 |
| 0.9.0 | 01 March 2023 |
| 1.0.0 | 25 January 2023 |
FAQ
- How do I log in to the mobile app?
You need to contact your account administrator to get the email address and password that will allow you to access the services offered.
- How do I reset my password?
You need to contact your account administrator to have your password reset.
- I have a message saying the Mapo Driver app is no longer synchronised, what does this mean?
This message indicates that the mobile app has lost its connection with the carrier's route planning tool. This can be due to various reasons: phone version, phone performance, no signal area, etc.
- How can I stop the app from tracking my location?
Go to the menu at the top left of the app, then click on "Settings", and in the "General" submenu, uncheck "Location Tracking".
- Why am I required to provide the requested prerequisites?
The prerequisites have been set at your manager's request to provide evidence for changing the status of a route.