Tracking completed missions
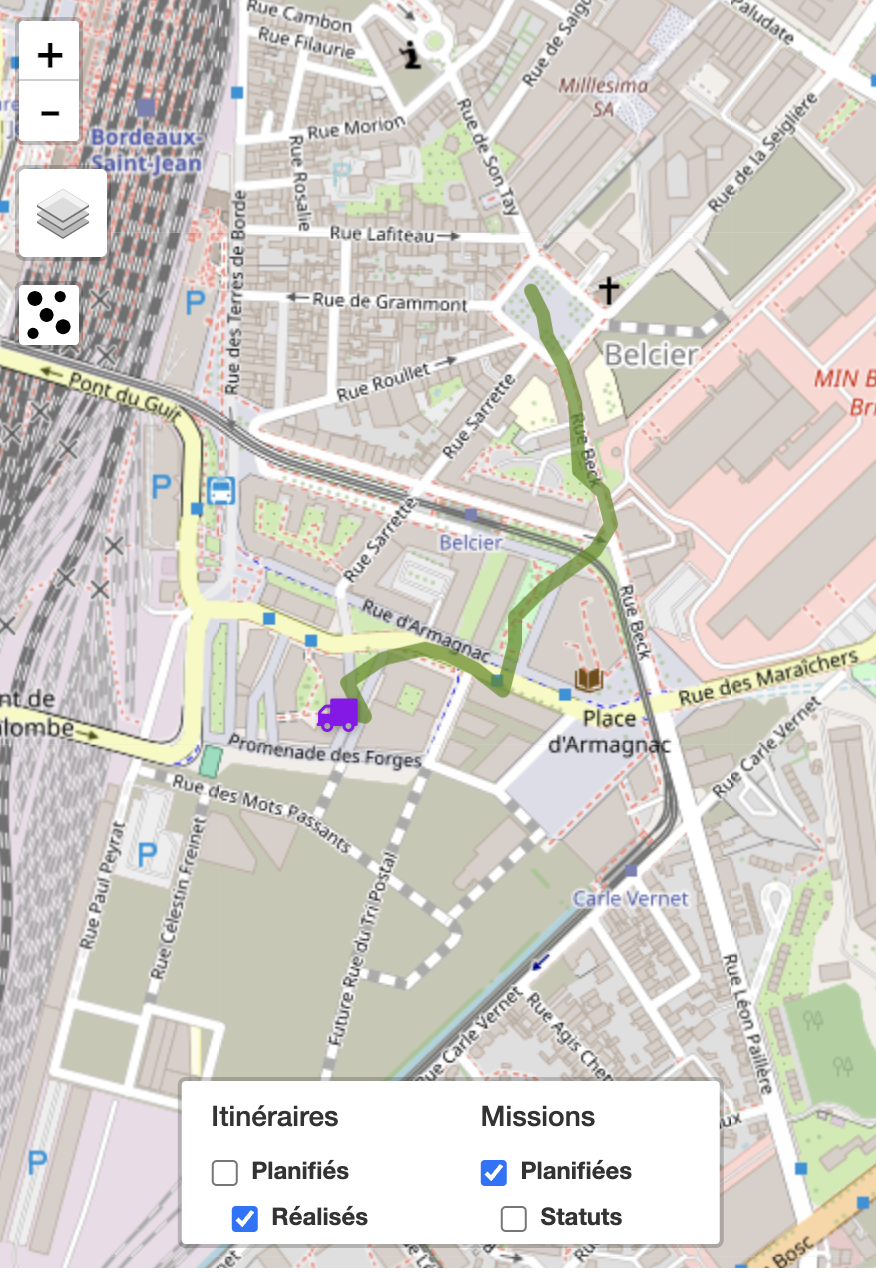
The planner or the user's manager can view the actual progress of the user's missions from the Mapo Planner tracking dashboard.
There are several conditions for viewing:
- The "Completed tracking" option is enabled on the account used by the user,
- The tracking is established:
- If all geolocation permissions are enabled in the mobile app
- Permission to use location
- Background permission
- Precise location permission
- When the user logs in to Mapo Driver
- If all geolocation permissions are enabled in the mobile app
- Tracking stops when the user logs out of Mapo Driver
Mass pick up & Mass delivery
The mass pick up solution was developed to address issues such as time spent, individual collections, low loading efficiency, and lack of control during loading and between loading and delivery.
Configuration
Mass Pick up is a solution that is not available by default in Mapo Driver and can be enabled on request.
It can be activated either for loading the route only, or for both loading and deliveries.
Scan partner
To complement and speed up the barcode scanning process, Woop has integrated a partner solution into the mobile app, making barcode identification faster:
- ability to scan from a distance,
- faster parcel identification,
- ability to scan in low-light conditions
- and many other benefits.
This partner integration is available in two options:
- the first offers high-performance scanning, suitable for fast loading and delivery;
- and the second uses AI and augmented reality scanning, ideal for identifying in the van boot the parcels related to a mission's loading and delivery
Description
1. General principle of Mass Pickup
Mass Pickup allows the driver to scan all the parcels for their route in a single loading session.
Each scan automatically links a parcel to a mission on the route and updates its status.
There are two possible ways to start.
2. Starting Mass Pickup
Option 1 – Immediate scan (quick mode)
From the route, when you click on the Mass Pickup action:
The app automatically opens the camera in barcode scanning mode.
The aim is to avoid any friction or wasted time.
This mode is used when the process does not require prior validation.
Option 2 – POD before scan
It is possible to configure the app to require a POD before scanning.
POD = proof of operation.
It can include:
Signature
Photo
Form
Comment
In this case:
The driver confirms the POD.
Once the POD is completed, the barcode scanner opens automatically.
Loading can begin.
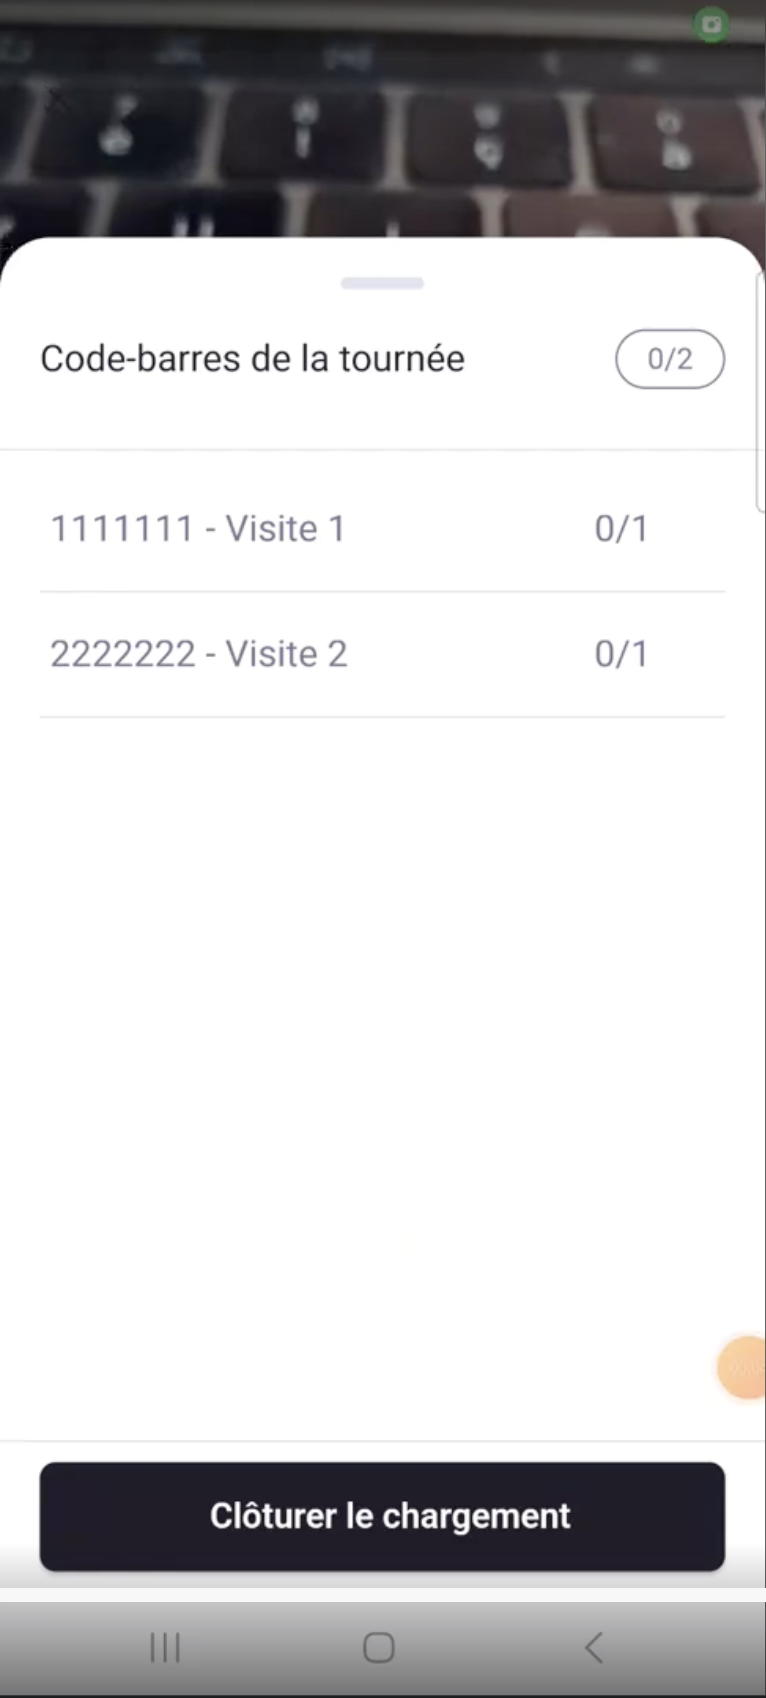
3. Scan screen – Mass Pickup
When the camera is active:
The user can see all the expected barcodes for their route.
Each barcode corresponds to a delivery (a mission).
Scan behaviour
When a barcode is scanned:
It is identified by the system.
It is automatically linked to the corresponding mission.
The mission is marked as scanned at loading.
No manual status update is needed.
4. Closing the loading session
When the driver finishes scanning:
They close the loading session.
All scanned missions automatically change status.
Example:
"To do" → "Loaded"
The update is automatic and systematic.
5. Reopening the scan after closing
It is possible that:
New parcels arrive after closing.
A parcel was forgotten.
The driver finished loading too early.
In this case:
The driver can return to the scan module.
They can scan the new parcels.
The corresponding missions will be updated automatically.
The system therefore allows reopening of Mass Pickup.
6. Managing parcels not scanned at loading
If a parcel cannot be scanned:
The driver can:
Check the parcel again (reading error, damaged label, etc.)
Report the missing parcel to their manager
Reporting allows the back office to handle the issue.
7. Synchronising new parcels
Important:
New parcels assigned to the driver are not automatically loaded into the scan screen.
If a parcel is added before, during, or after scanning, the driver must return to the “Route list” page. This is where the app retrieves new missions from the back office tools. Without returning to the list, new parcels will not be visible.
8. Mass Delivery – Grouped delivery
Mass Delivery works on the same principle as Mass Pickup, but applies to handing over to the customer.
8.1 Accessing a destination
If several parcels belong to the same destination:
The driver clicks on the destination.
The app displays all barcodes linked to that address.
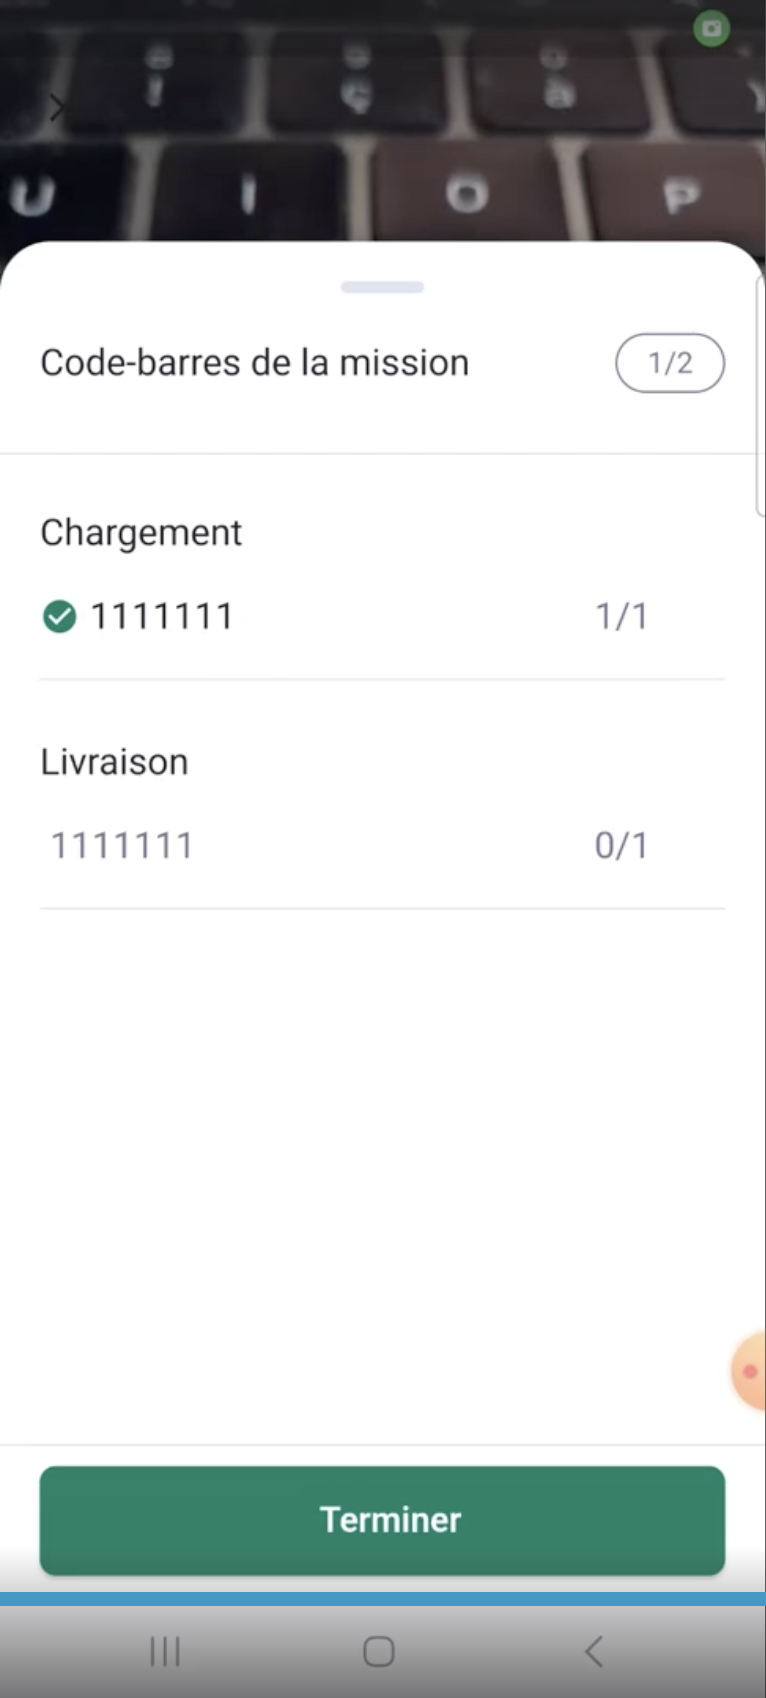
8.2 Scanning at delivery
To confirm handover:
The driver must rescan the parcel’s barcode.
The scanned barcode must match the one scanned at loading.
If the scan matches:
The mission automatically moves to the final status (e.g. "Delivered").
8.3 Grouped delivery
If several parcels are linked to the same destination:
The driver can scan all the barcodes one after the other.
Each mission is updated automatically.
All statuses are updated individually.
There is no global validation without individual scanning.
Each parcel remains independent in the system.
8.4 Exceptions at delivery
If a parcel cannot be delivered, for example, if it is damaged, the customer is absent, the customer refuses it, or there is a transport problem, the driver can:
Apply a specific status (reason for failure)
Add a comment if needed
Report the problem to their manager
The status is then updated accordingly (e.g. "Delivery failed").
9. Managing incidents after loading
If a parcel checked at loading has a problem during transport:
The driver can report the incident from the mission.
They can document the problem.
The manager is informed.
The system therefore allows:
Loaded → Transport incident → Back office processing
11. Key points to remember
1 barcode = 1 mission = 1 parcel.
Statuses update automatically after scanning.
Scanning can be reopened after closing.
New parcels require returning to the route list.
Each parcel is handled individually, even in mass mode.
Auto-assignment of missions from other routes
Context
Picking up missions concerns routes for the current day or the following days and can be:
Routes later in the day
Routes planned for later in the week
Routes not yet planned
Lorries are not always filled to capacity, some parcels are scheduled for future routes, the depot does not always have an operator to adjust parcel assignments in real time in Mapo Planner, so Mapo Driver has decided to let the driver optimise the loading of their lorry themselves.
The aim is to allow the driver to:
Scan a parcel not planned for their current route
Attach it to their ongoing route
Optimise the loading of their lorry
All in a smooth and trackable way.
1. General Operation
1.1 Scanning a parcel outside a route
When the driver scans a barcode, the parcel may correspond to:
1 parcel = 1 mission
N parcels = N missions
No known parcel
A mission from another route
A planned future route
An unplanned future route
1.2 Detecting belonging to another route
If the parcel belongs to another route:
A pop-up “Add a parcel” appears.
The driver can choose to attach it to their route.
1.3 Route selection (dropdown menu)
In the dropdown list provided, Mapo Driver displays 3 levels:
Route name
Mission name
Planned route date
2. Validation
When the driver clicks on “Add the parcel”:
The request is sent to our back-office tools.
The parcel is reassigned to the current route.
The mission is now attached to its route.
The parcel collected by driver A has been removed from driver B, or from the original route
The tracking dashboard updates to ensure traceability for the manager
3. Error management
3.1 No mobile network
If the mobile has no network:
After:
Scan
Pop-up display
Click on “Add the parcel”
Then:
An error message is displayed.
The action is not completed.
3.2 Technical reason
If a technical error occurs:
A screen with a toaster is displayed:
"An error has occurred"
No reassignment is carried out.
4. Post-addition visualisation
Once the parcel has been collected:
If the driver returns to the Mass Pickup screen:
They see the barcode.
They see the attached mission.
The parcel is included in their route.
This ensures:
Operational consistency
Traceability
Immediate visibility
5. Special cases
A barcode may:
Correspond to several missions
Not correspond to any mission
In the case of an unknown code:
An error message is displayed.
No attachment is possible.
Geofencing
The geofencing solution has been developed to address issues of forgetting or delaying the update of the final status on a mission. Not updating the final status leads to confusion for the manager or the end customer, and causes frustration.
Configuration
Geofencing is a solution that is not present by default in Mapo Driver, and can be activated on request: at the departure depot, at the arrival depot, on missions or in contexts with high density of points.
Description
1. Definition of Geofencing
Geofencing in Mapo Driver allows you to automate or suggest status changes based on the driver's GPS position.
There are two operating modes:
Automatic application of the final status
Suggestive popup (non-blocking alert)
The default radius is 150 metres, but it can be adjusted depending on the use case (dense urban areas, rural areas, specific logistics sites, etc.).
Automation is activated when the driver:
Leaves the defined radius
Enters the defined radius
2. First use
When geofencing is activated for the first time:
Mapo Driver displays an information message.
This message offers the driver the option to activate automatic status updates.
If the user confirms (box ticked):
Automation is activated.
The message will no longer be displayed.
If the user does not confirm:
The system will operate in suggestive popup mode.
3. Mode 1 – Automatic status application
3.1 Trigger
If the driver leaves the radius of a mission and:
No final status has been applied
Then:
Mapo Driver automatically applies the final status to the mission.
Example:
"In progress" → "Delivered"
3.2 Cascade update
Once the final status is applied:
The status of the next mission automatically changes to an intermediate status (e.g. "Next" or "In progress").
This helps maintain the consistency of the operational flow.
3.3 Triggering SMS
If automatic client SMS sending is configured:
The SMS is only allowed if statuses are correctly updated.
This ensures the information sent to the customer is relevant.
No consistent status → no SMS sent.
4. Managing dense areas
In a context with a high density of delivery points:
Setting the radius becomes strategic.
A suitable radius allows several updates to be triggered at once.
This allows for:
Significant time savings
Smoother tracking
Better tracking accuracy
The system can therefore update several missions when the driver leaves a compact area.
5. Geofencing applied to depots
Geofencing can also be activated on:
Departure depot
Arrival depot
For this to work properly:
The depot must be in an intermediate status (e.g. "In progress").
Thus:
Entry into the departure depot → automatic update
Exit from the arrival depot → automatic update
Special case: departure depot = arrival depot
If the departure depot and the arrival depot are at the same location:
Mapo Driver treats the two events separately.
The system prevents both statuses from being updated automatically at the same time.
This prevents a mission from being closed incorrectly before it has even started.
6. Mode 2 – Suggestive popup (non-blocking alert)
This mode works on the same geographical detection logic as automation, but without automatic updates.
6.1 Trigger
If the driver:
Leaves the radius of a mission
Has not set a final status
Then:
An attention popup appears.
6.2 How the popup works
The popup:
Informs the driver that a final status appears to have been missed.
Suggests an action.
When the driver clicks "Ok, got it":
The popup disappears.
They are redirected to the mission detail page.
They can update the status.
They are not forced to do so.
The system never blocks the user.
6.3 Alert repetition
Each time a final status is missed:
The popup appears again.
There is no memory of a previous missed status.
7. Mandatory conditions for operation
Automation or suggestion only works if all the following conditions are met:
Geolocation is enabled in the Mapo Driver settings.
Geofencing is active during route hours.
The route is in progress (at least one mission with "In progress" status).
Geofencing is only active for today's routes.
Mapo Driver has detected a previous status change.
If any of these conditions are not met:
No automatic or suggestive trigger will occur.
8. Key points to remember
The default radius is 150 m.
It can be configured.
Two modes: automatic or suggestive.
No user blocking.
Status consistency determines SMS messages.
Depots are handled differently from missions.
The system distinguishes between departure and arrival depots even if the location is the same.