Mission Details
When you click on a mission from the route screen (see above), you’ll be able to access its various details.
Depending on the settings enabled for you, you’ll have access to different features.
These allow you to manage and track missions in real time.
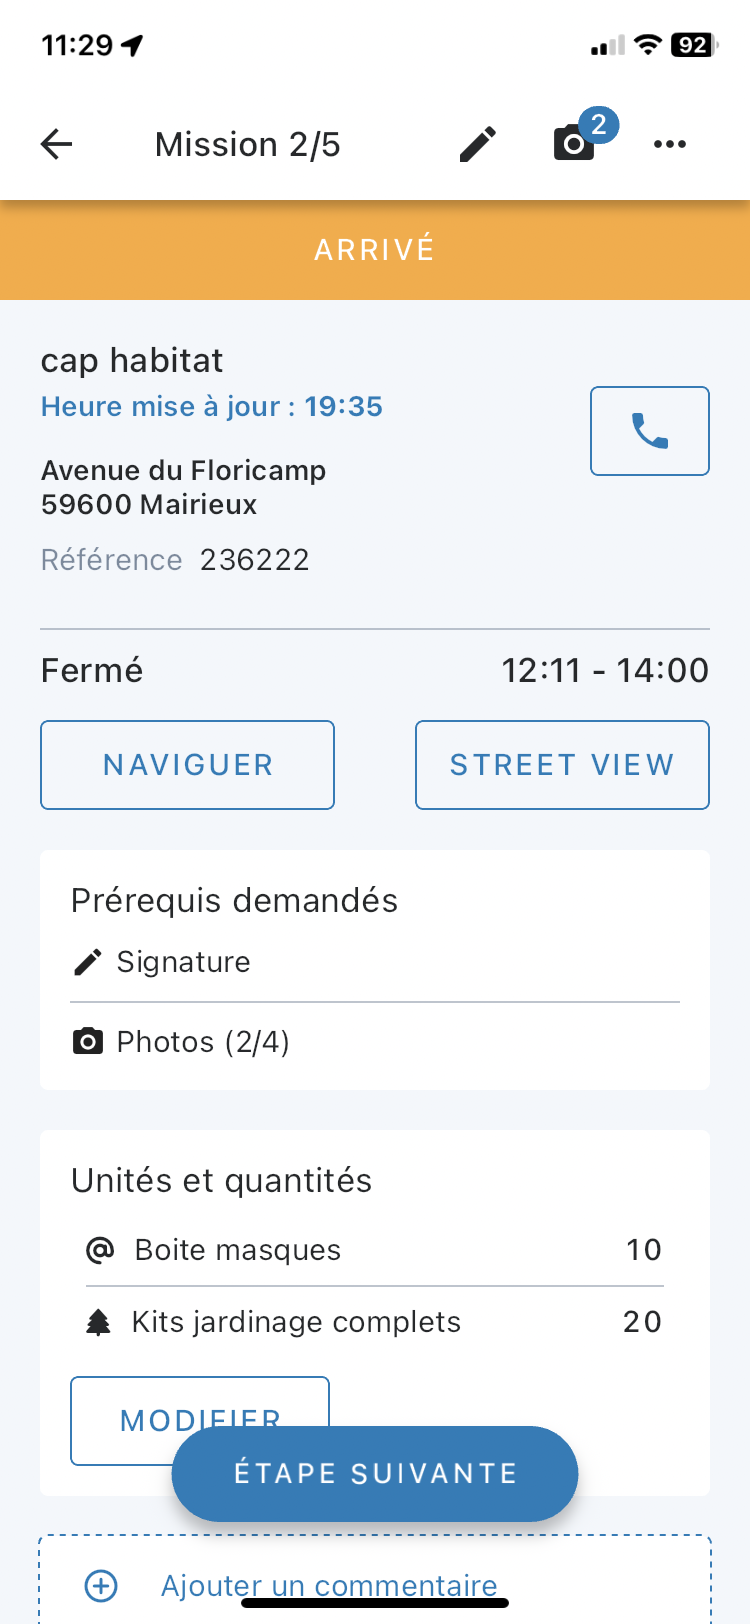
First, you’ll find a description of the mission with:
- a delivery status,
- a label,
- the scheduled time for the mission,
- the destination address - you can edit it if it’s incorrect, or copy and paste it -,
- and a comment.
Next, you’ll be able to:
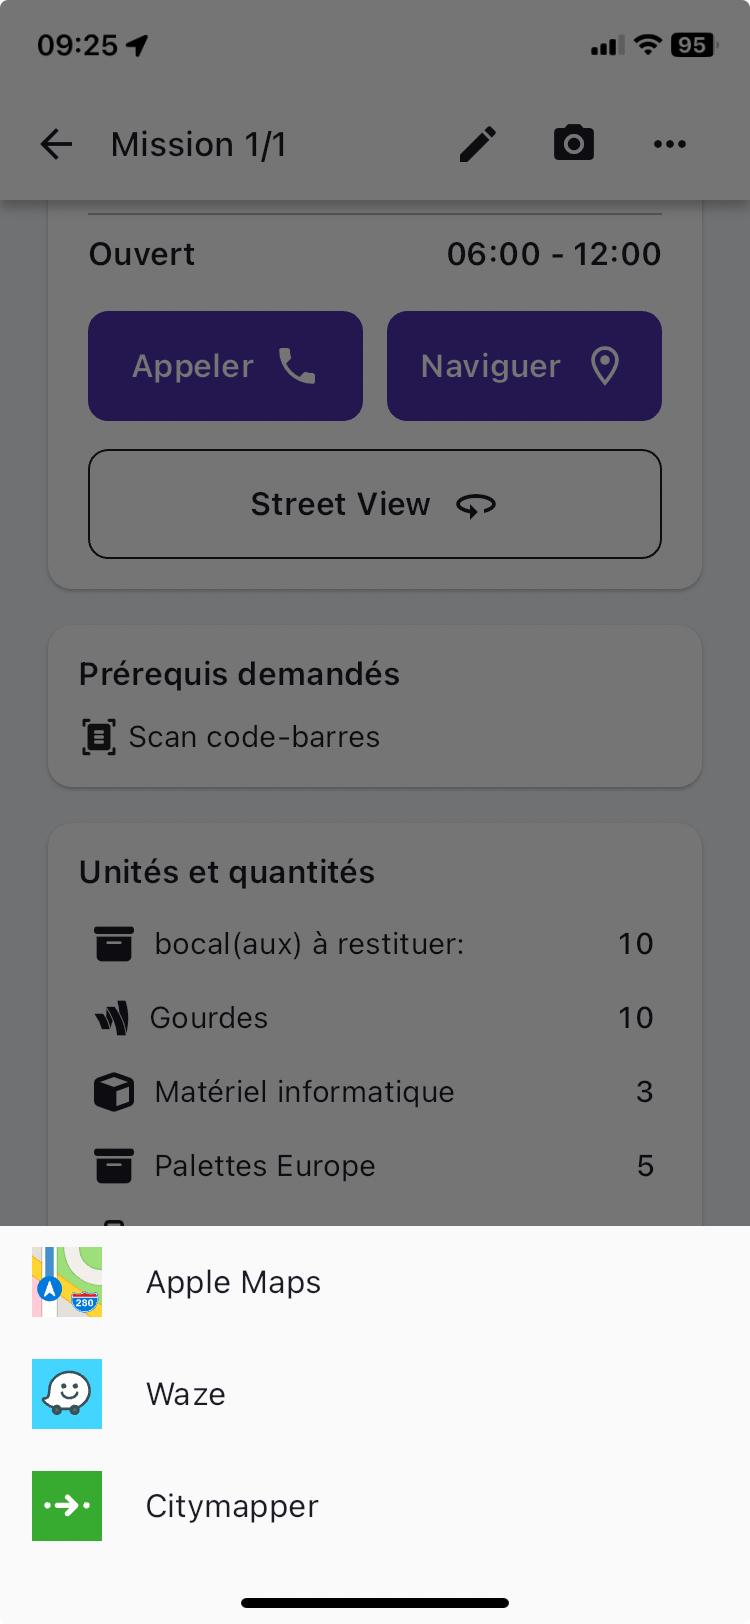
- navigate to the address using third-party apps installed on your device (Waze, Citymapper, Apple Maps, Google Maps),
- call the recipient directly,
- view the actual location of the mission address with Google, to help plan parking when you arrive at the customer’s,
- access the map showing the user’s position and all route points to complete. From the mission detail page, clicking on "Map" will take the user to the map at the relevant mission point.
- fill in the required signature and photo at delivery,
- and add a comment if needed.
Finally, by scrolling down, you’ll find further details about the mission, such as its details and units & quantities.
From the "Edit" button, you can:
- search by unit,
- save any changes made,
- or reset them.
Mission Labels
From the Mapo planning tool, you can highlight informative features for a mission.
These help users better understand what’s expected or the context of their mission among several on their route.
You can add as many as you like, rename them, and choose any colour you want.
These labels appear at the very top of the mission detail page.
Time Slots
From the Mapo planning tool, you can enter one or two time slots so the user can see them, deliver efficiently, and avoid waiting or having to re-deliver.
If nothing is entered, the app won’t display anything. Depending on the time on their phone, if the user is:
- within the time slot, they’ll see "Open",
- outside the time slot, they’ll see "Closed".
View a Document
From the Mapo planning tool, the user’s manager can add a document URL that the user can view from the mission detail screen.
When this URL is provided and sent to the user, they just need to click it to view the document in "Additional Information".
They can zoom in or out to see the information more clearly.
The shared document can be in any format: .pdf / .xls / .word / .ppt etc.
Status Management
All the statuses that make up a mission are called the 'workflow'. This lets you adapt the working context for drivers according to your needs.
There’s a standard workflow with simple status management, and a workflow that can be customised in several ways.
A mission status can be updated either:
- by clicking the coloured banner at the top,
- or by clicking the button at the bottom.
The way status updates are managed can be set up according to client preferences.
Comment
From the mission detail screen, clicking on "Add a comment" will bring up a pop-up where you can leave a comment on the current mission.
When you return to the mission detail screen after entering your message, you’ll see a small tick on the "Comment" box to show your message has been saved.
You can go back to it at any time during your route to edit or delete it as you wish.
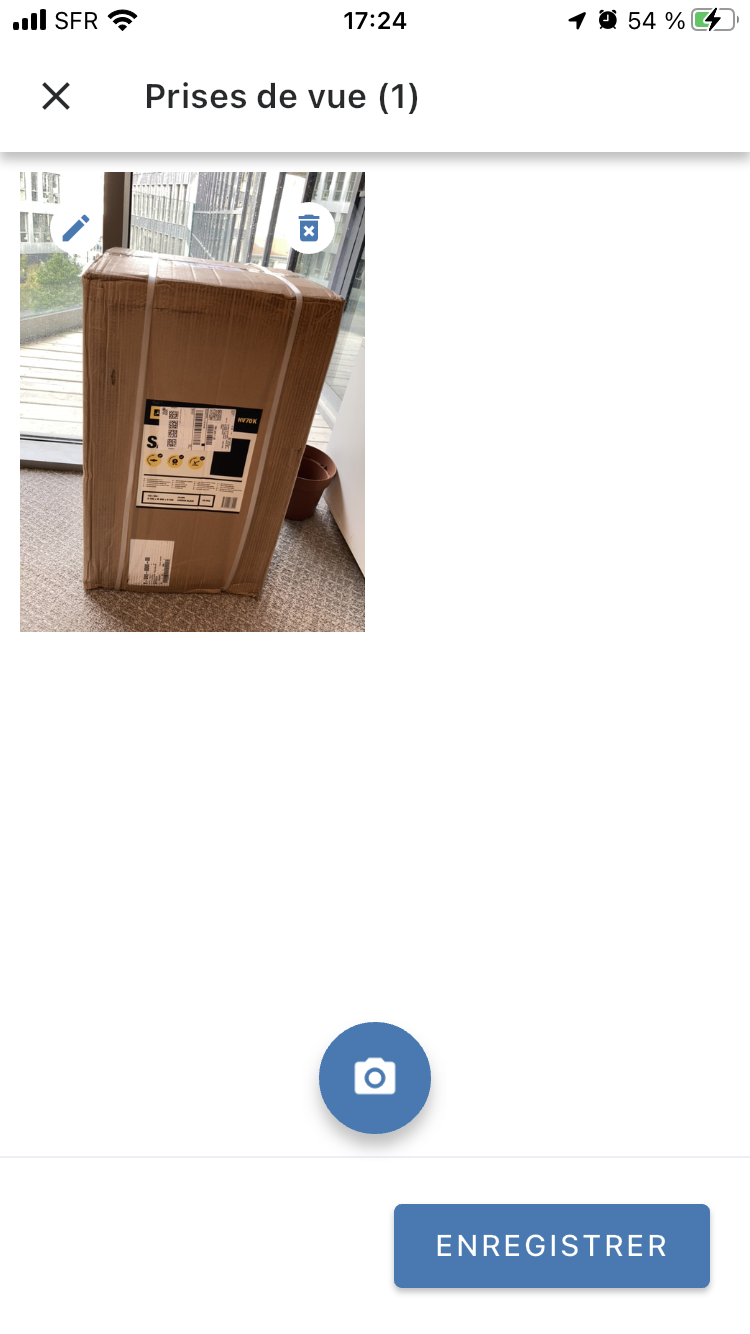
Photos
At the top right of the mission detail screen, you can access the "self-service" camera by clicking the camera icon, to provide proof of delivery for your mission, or to report an issue, for example.
As an alternative to taking a photo "live", you can import a photo from your phone’s gallery. This is useful if you have no network connection.
When you return to the mission detail screen after adding your required photo, you’ll see a small tick on the "Photo" box confirming your photo has been saved.
You can add notes by clicking the pencil at the top left of the photo you’ve taken.
Just swipe your finger to add more information to the photo.
Click the back arrow to delete your previous edit.
Click the save button on the far right to save your photo with the edit.
Finally, photos are timestamped with the date and time they were taken. The timestamp is added automatically after the photo is taken.

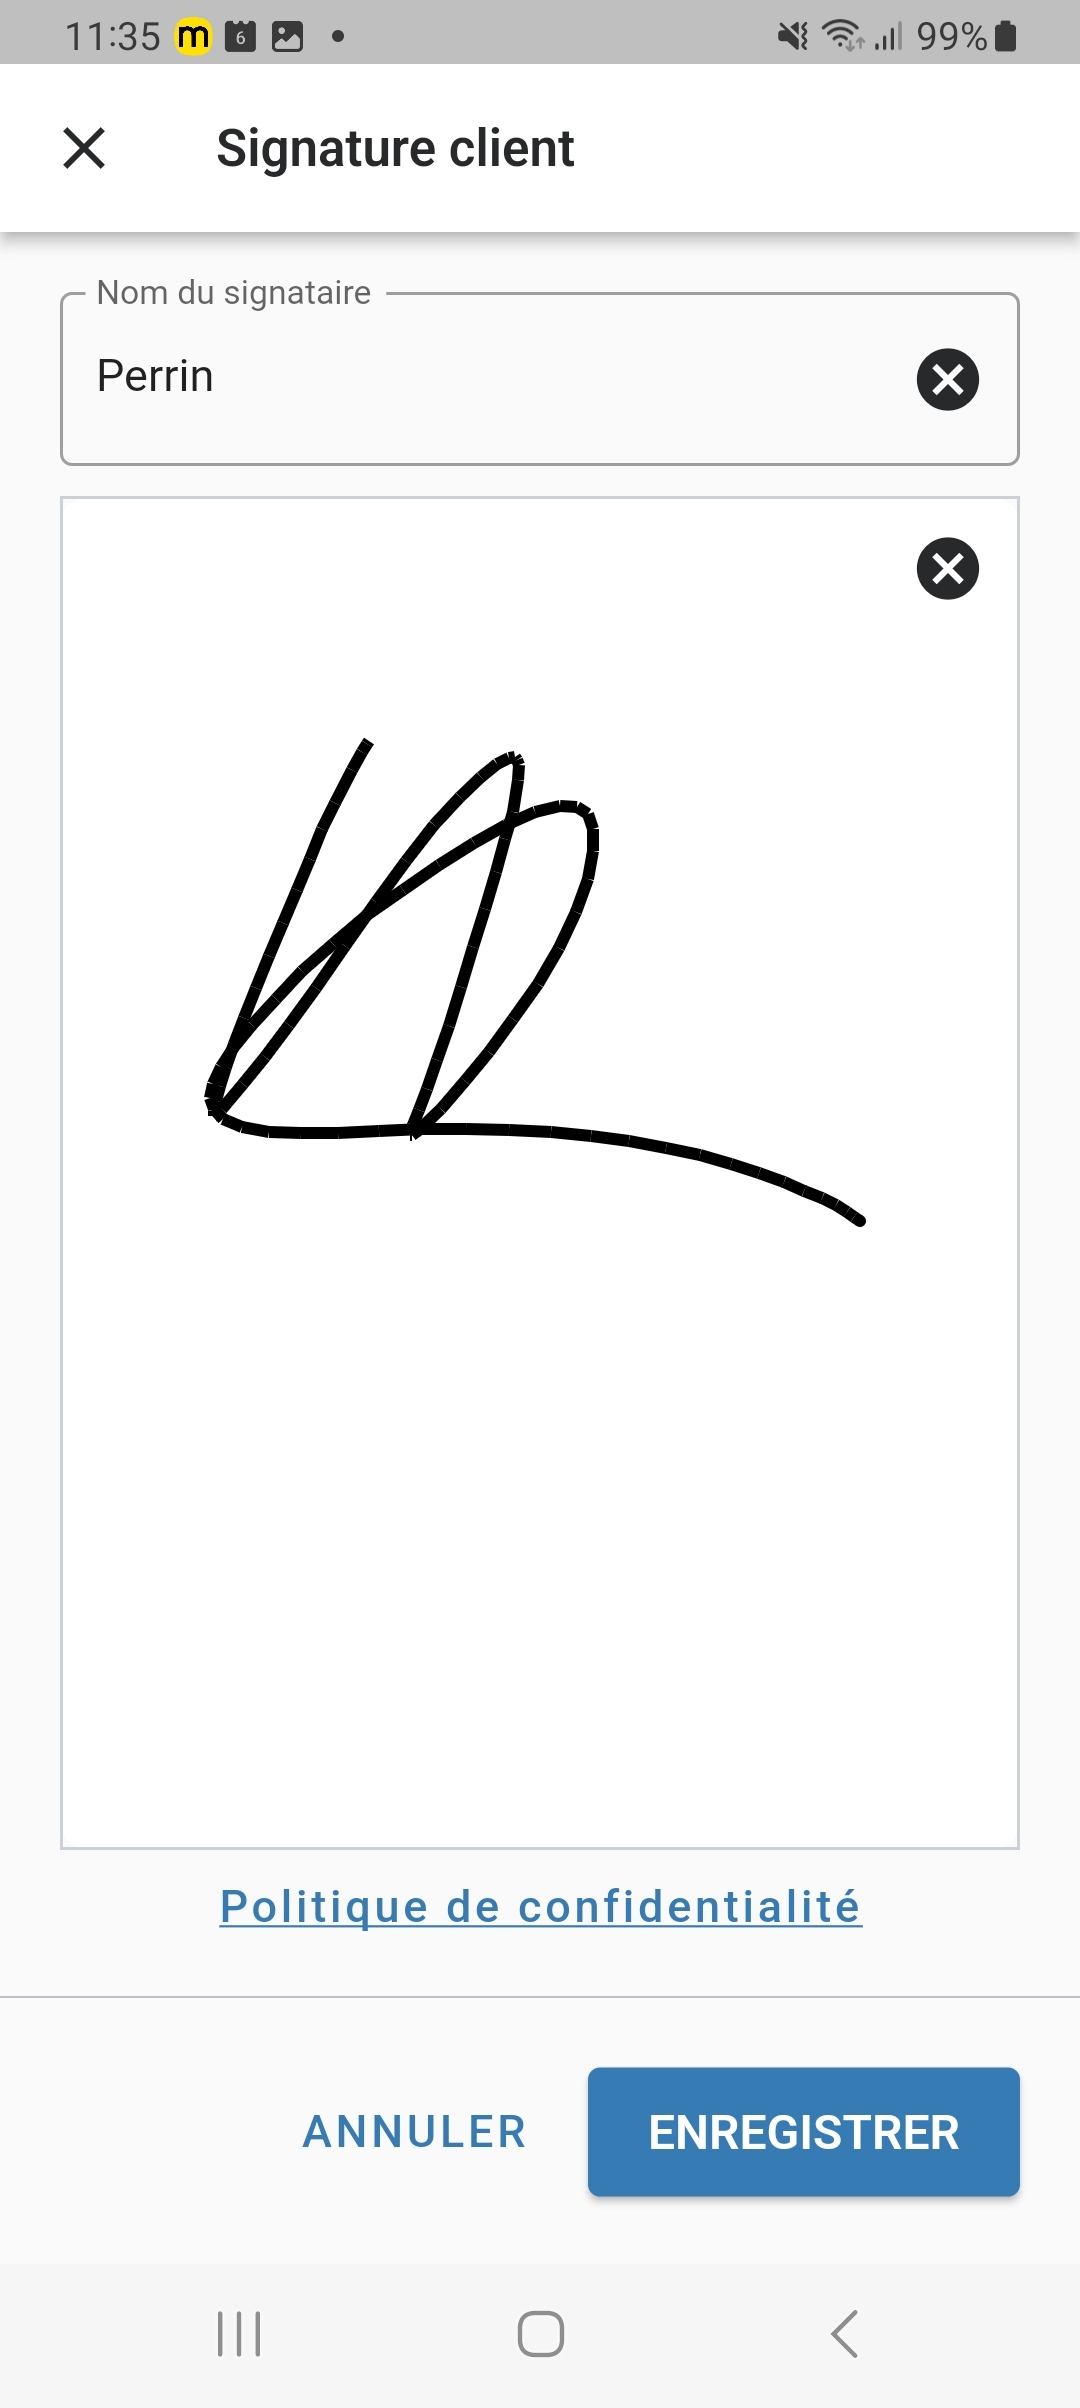
Signatures
At the top right of the mission detail screen, you can access the signature feature by clicking the pencil, to provide proof of delivery for your mission.
To save time, the customer’s name is pre-filled. You can delete it if needed. All that’s left is to sign and save.
When you return to the mission detail screen after entering the signature, you’ll see a small tick on the "Signature" box to show the signature has been saved.
Signatures are also timestamped with the date and time. The timestamp is added automatically after signing.
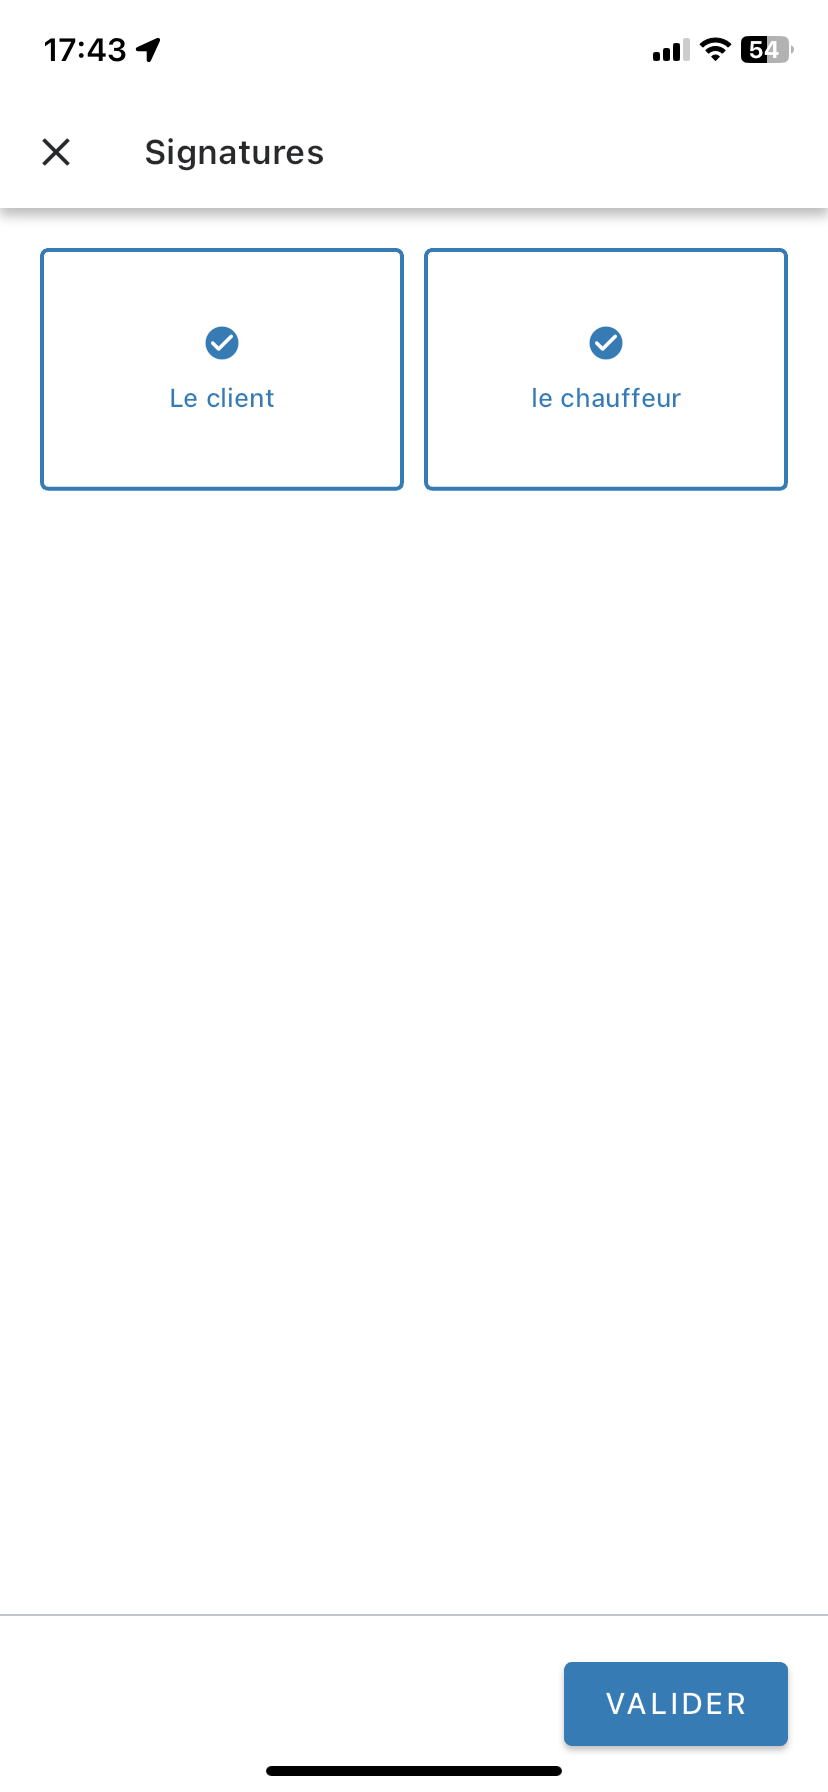
Multi-signatures
From the mobile app, you can set up multi-signature so both the client and the user can sign.
To save time, the customer’s name is also pre-filled. You can edit it if needed. All that’s left is to sign and save.
Forms
These are accessible from the mission detail screen. They can be set as a required prerequisite if needed.
If the required form prerequisite is active, the user must fill it in to change the mission status to "Completed". Otherwise, the mission status will remain "In progress" or change to "Issue".
Clicking on "Forms" will open a pop-up showing one or more forms, which can be set up by a manager.
These forms can take different shapes depending on your needs: feedback, issue reports, satisfaction surveys, etc.
They can also be of different types: radio buttons, checkboxes, or text fields.
When a form is filled in and saved, you’ll see a small tick on the mission detail screen confirming the form has been completed.
If needed, the form can be set so that answers must be numeric only.
 $
$
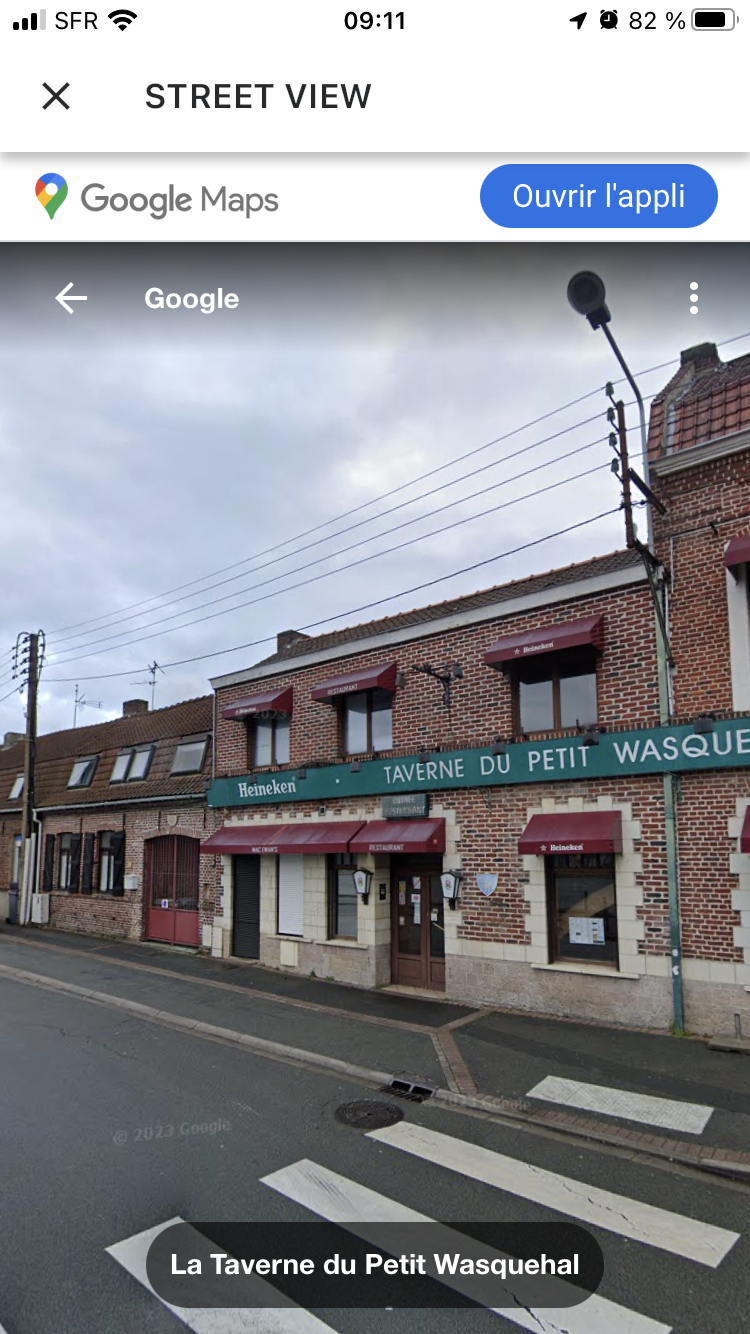
Street View
Clicking the "street view" button will open Google Maps in the mobile app at the mission’s delivery address.
You can plan your delivery by checking for possible parking or vehicle access issues. This helps you prepare and save time by avoiding surprises.
Click the cross at the top left of the page to return to the mission detail page.
Additional Information
Note! Custom fields will only be visible if the account administrator has filled them in!
Custom fields appear in the "Additional Information" section on the mission detail screen.
You can enter:
- a first field for a title,
- and a second for a description.
Additional information is view-only; it can’t be edited from the mobile app, only from the Mapo Web admin.
If the description is long, a "Display more" button will appear. Clicking it will show the full description.
Position Recording
You can record your position by clicking "Record position". The coordinates can then be retrieved in the route reporting in the planning tool.
Position recording lets you mark a suitable spot or entrance for your vehicle if the original address doesn’t allow it.
If your phone settings or location services don’t allow position recording, a warning pop-up will guide you through the process.
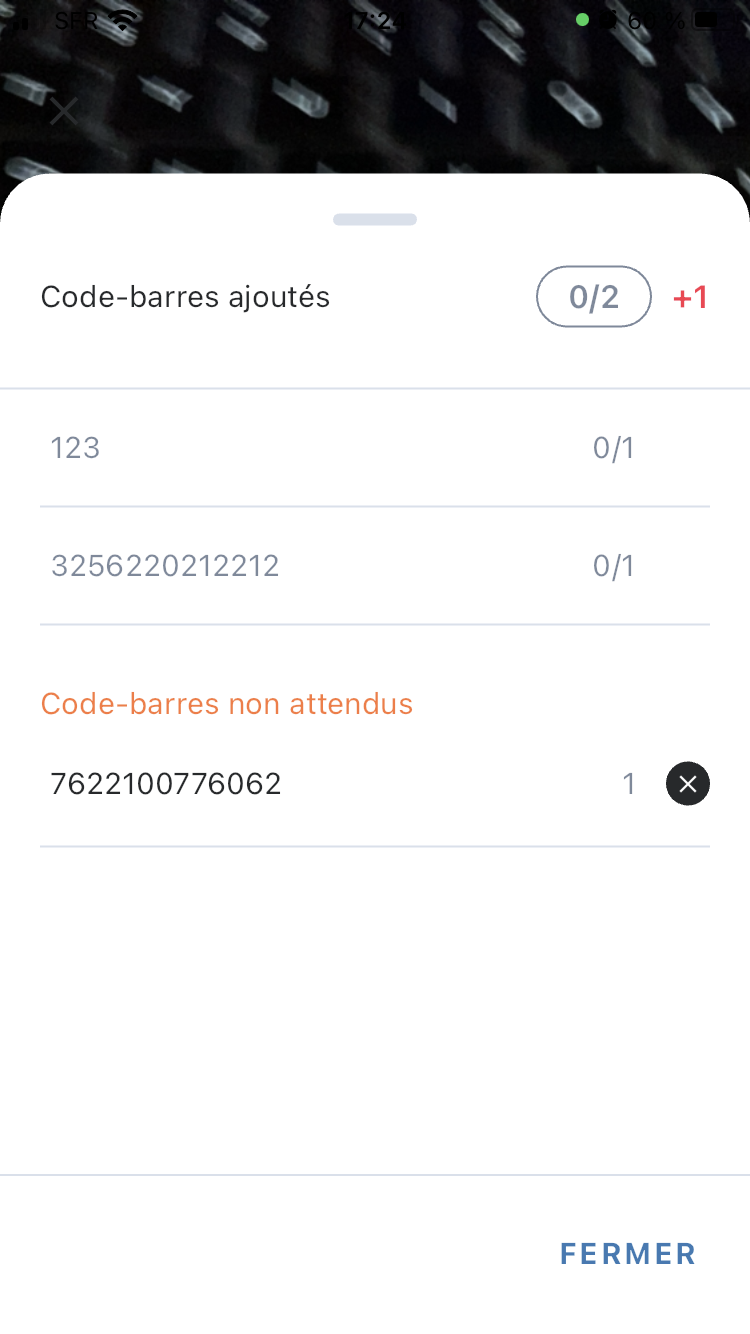
Barcode & QR Code Scanning
From the mission detail screen, you can scan barcodes and QR codes using your smartphone’s camera.
When the scan recognises the barcode, a confirmation message will appear: "The barcode has been added".
If a parcel’s barcode is damaged or the scan can’t read it, you can click the "pencil" to enter it manually.
You can see the number of scanned barcodes from the indicator. If you swipe the window up:
- you’ll see the serial numbers of the added barcodes,
- you’ll be able to spot if the same barcode has been scanned more than once,
- you can delete scanned barcodes by clicking the cross.
For barcodes expected to be scanned, if their respective parcels have an issue, the user can finish scanning and report the problem to their supervisor.
The scan supports the following formats:
|
|
Expected barcodes
On a mission, you can identify the expected barcodes that your manager has set up from their route planning tool.
If you scan the barcode that matches the expected one, you'll see a small tick confirming that the expected barcode you scanned is valid.
If you scan a barcode that isn't one of the expected ones, a confirmation pop-up will appear.
You can either "abandon" so your barcode scan is deleted, or "keep" it if you want to save it. In this case, the unexpected barcode will be shown in a menu.
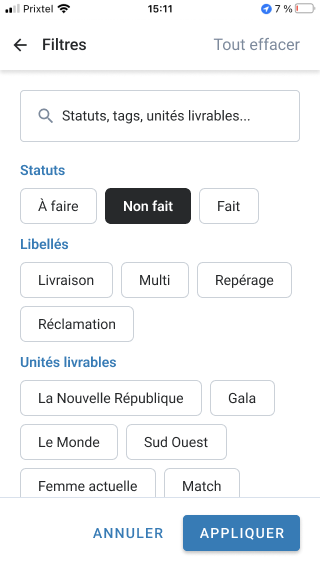
Mission filters
The filters are directly accessible from the page listing the missions of a route.
The page has a search bar as well as all the features specific to the missions in the route that the user needs to complete:
- statuses,
- labels,
- and deliverable units.
When the user starts typing in the search bar, the page filters statuses, labels and deliverable units to match the user's search.
The user can also use the filters, which work like buttons, and activate the filter as needed.
When you click on "Apply", the mobile app will display the results of the selected filters. In addition, the user will see a badge showing the number of filters selected.
Finally, the user can access the details of their filtered missions afterwards. They can interact with the different features available from the mission detail page while staying in this filtered missions context.
Mission prerequisites (POD)
The setup of mandatory supporting documents to be provided at a mission status can be configured.
Photos, signatures, comments, forms or scans can be required so that the user must provide these items to justify updating a status. Without providing the requested items, the mission status will remain at the previous status.
The setup can be configured as needed from 1 up to a maximum of 5 proofs. If more than one supporting document is set up, the user must complete all items for one proof before moving on to the next.
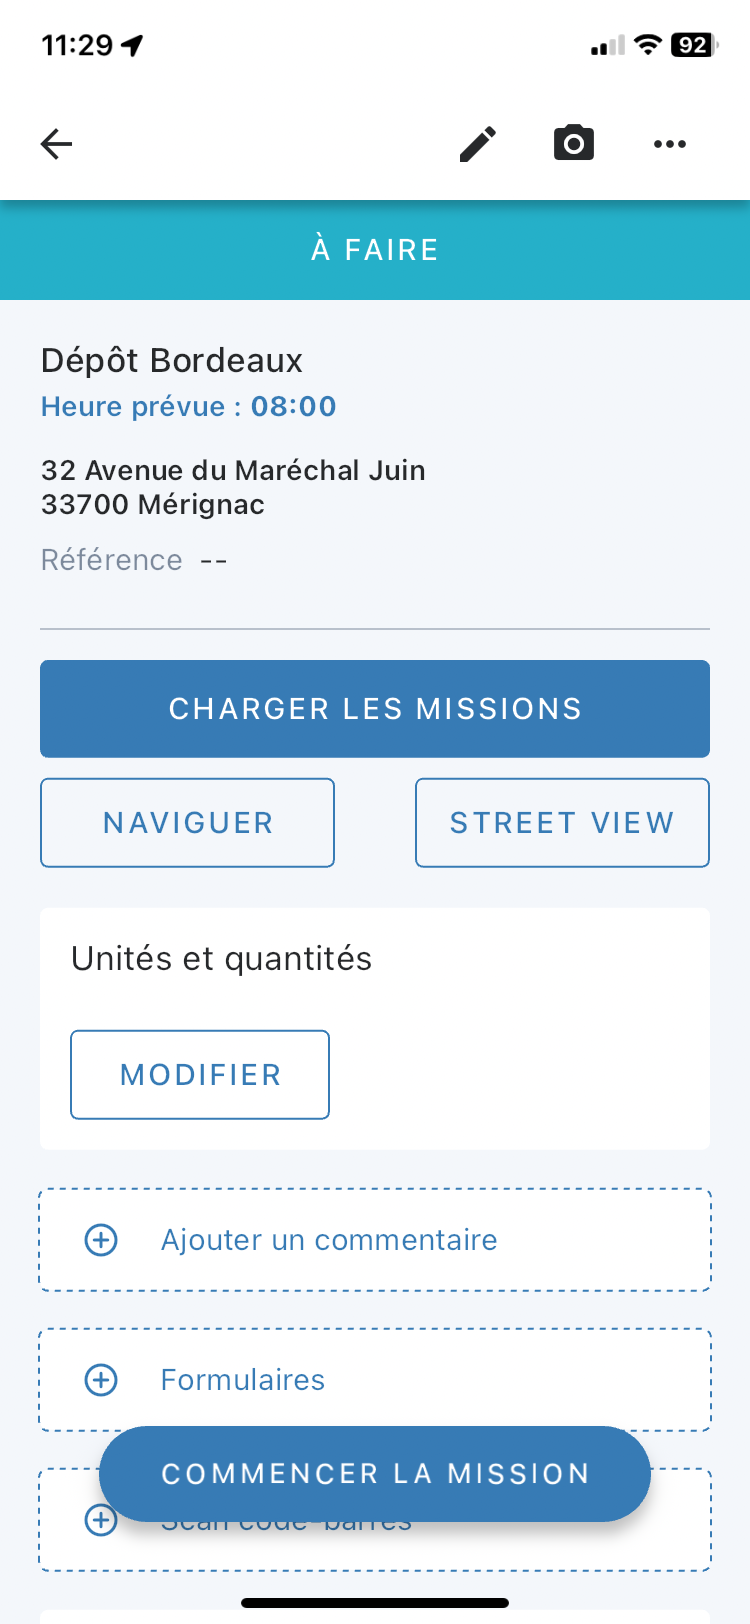
Load management
When the load management configuration is activated, the user can find the "Load missions" button on the departure depot page.
Clicking this button takes you to the load management page for all the missions that make up the route.
The user can return to the load page as many times as needed.
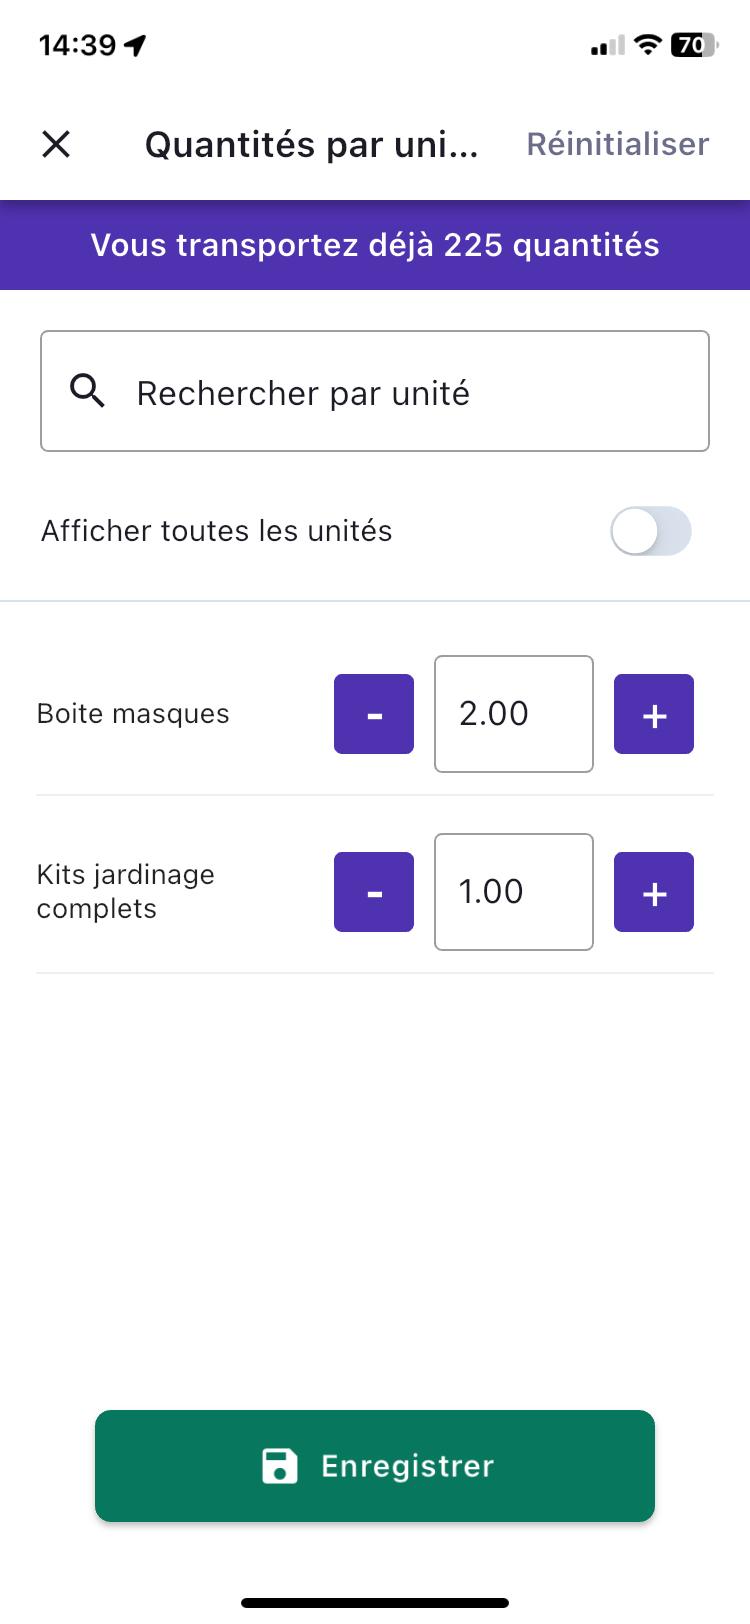
Total declared quantities
From the mission detail page, when you click "Edit" on the "Units and quantities" widget, you go to the edit page.
Here, you can see the total amount of goods being transported in your lorry to make sure you don't exceed your capacity.
The total transported amount updates automatically for any changes made to quantities on your mission after clicking the "Save" button at the bottom.
Navigation apps
To make things easier for users, Mapo Driver works seamlessly with the most common navigation apps.
When you click "Navigate", depending on your phone type (Android or Apple) and the navigation apps installed, Mapo Driver will suggest those apps.
When you click on one of these apps, the user is automatically redirected to the selected app, and their itinerary will be automatically calculated from the GPS coordinates of the mission address.
Currently, the following navigation apps are supported: google, googleGo, amap, baidu, waze, yandexMaps, yandexNavi, citymapper, mapswithme, osmand, osmandplus, doubleGis, tencent, here, petal, tomtomgo, roadlords and Nav XL.
Finally, we've partnered with Nav XL to allow users to benefit from navigation services specifically for HGVs.
Customising features
1. Purpose
Allow the driver to customise the display of their “Mission Details” page using simple toggles.
The driver must be able to: activate, deactivate and adapt.
The widgets and features to suit their daily work.
2. Scope
⚠️ Strictly limited to the “Mission Details” page.
No customisation applies to:
Mission list
Route list
Other pages
3. Hierarchical logic of settings
Fundamental rule:
Settings at the client account level always take precedence over the Driver's settings.
If a feature is activated or enforced on the client account side:
The driver will not see it in their options.
They cannot deactivate it.
It is mandatory.
4. Features that can be activated/deactivated
The driver can switch ON / OFF the following items:
Itinerary / Navigation
Street View
Map
Units and quantities
Signature (if no mandatory prerequisite)
Photo (if no mandatory prerequisite)
Comment (if no mandatory prerequisite)
Self-service scan (if no mandatory prerequisite)
Position recording
⚠️ If an item is required by a workflow or prerequisite, it becomes non-editable.
5. Mandatory block (not customisable)
Some items are always displayed and can never be hidden:
Estimated time of arrival (ETA) (if available)
Route name
Destination address
Time slot
Destination reference
Planner comment (if available)
Client call (if available)
Additional information (if available)
Tags (if available)
This block forms the minimum information base.
6. Widgets enforced by the database
Some widgets are activated on the database side.
If they are active:
They are always displayed.
They do not appear in the customisation menu.
List:
Tags
Quantities
Comments
Forms
Barcode scan
Prerequisite CTA / statuses
Labels
Quantities
The driver cannot interact with these settings.
7. Saving
When the driver clicks on “Save”:
Mapo Driver saves the toggles that are switched on or off.
The configuration is saved.
The “Mission Details” page instantly reflects the customisation.
If the driver leaves without saving:
No changes are applied.
Manual reordering of route missions
Drivers have expressed strong dissatisfaction with the order of deliveries.
Main reasons:
Customer requirements not taken into account
Actual opening hours not respected
On-the-ground constraints ignored
Theoretical optimisation disconnected from daily reality
1. Scope
The following operational contexts are not included (initial exclusion):
Pickup & Delivery
Weekly planning
2. Accessing the feature
The driver can access the "Reorder" button, visible from the list of missions.
3. Access conditions – Filter management
⚠️ If filters are active on the missions:
A popup appears: "You must deactivate the filter(s) on your missions to be able to reorder them."
Reordering is blocked.
If all filters are deactivated: reordering is allowed.
The logic is simple: you can't reorder a list that's only partially displayed.
4. First use
On the first click on "Reorder" (if no filters are active):
An explanatory popup appears.
It explains how to use drag & drop.
On subsequent clicks, the popup no longer appears.
5. Edit mode
Once activated:
The driver sees drag & drop on the mobile list.
They can move missions around.
They can make several changes to the order in a row.
As long as they haven't clicked "Save", they remain in edit mode.
6. Saving
If the driver clicks "Save":
Mapo Driver saves the new order.
The missions are permanently reordered.
The changes are sent to the back-office tools.
If the driver clicks "Cancel":
All changes are cancelled.
They are redirected to the list of route missions.
No modified order is kept.
7. Technical impacts
Each reordering triggers:
Update of the route map
Recalculation of all ETAs
Update of time windows (open/closed)
Sync with Mapo Planner
The new order is sent to Mapo Planner so that:
It shows the change in the tracking dashboard
Route tracking stays in sync with the mobile app
8. Managing time windows
Opening/closing of time slots is recalculated if a mission moves into or out of a slot.
Reordering therefore affects:
ETA
Availability
Time validity